F#でWPF --- 好きな図形のコントロール作成 --- Geometry利用
下記記事にて好きな図形のコントロールを作成しました。
F#でWPF --- 好きな図形のコントロール作成 - 何でもプログラミング
その際、独自のヒットテストを実装しようとすると、ロジックを一から実装しなければなりませんでした。
今回はGeometryクラスを用いてヒットテストの実装を楽にしてみます。
描画する図形
前記事と同じ図形を描画します。

CustomShape
Geometryを定義し、描画の際はDrawGeometryを利用し、ヒットテストの際はStrokeContains(もしくはFillContains)を利用します。
HitTestDisabledDrawingVisualは前記事を参照してください。
type CustomShape() =
    inherit FrameworkElement()
    let visual = HitTestDisabledDrawingVisual()
    let lines  = [ LineGeometry(Point(15.0, 15.0), Point(85.0, 85.0))
                   LineGeometry(Point(85.0, 15.0), Point(15.0, 85.0)) ]
    let circle = EllipseGeometry(Point(50.0, 50.0), 50.0, 50.0)
    let pen = Pen(Brushes.Red, 5.0)
    let group = DrawingGroup()
    do  use g = visual.RenderOpen()
        lines |> List.iter (fun x -> g.DrawGeometry(null, pen, x))
        g.DrawGeometry(null, pen, circle)

    override this.VisualChildrenCount = 1

    override this.GetVisualChild _ = visual :> Visual

    override this.HitTestCore(hitTestParameters : PointHitTestParameters) =
        if lines |> List.exists (fun x -> x.StrokeContains(pen, hitTestParameters.HitPoint)) ||
           circle.StrokeContains(pen, hitTestParameters.HitPoint) then
            PointHitTestResult(this, hitTestParameters.HitPoint) :> HitTestResult
        else
            null :> HitTestResult
動的に描画内容を変更
前記事と同じく、DrawingGroupクラスを間に介入させることにより、動的に図形を変更することが可能です。
let group = DrawingGroup()
do  use g = visual.RenderOpen()
    g.DrawDrawing(group)

...
use g = group.Open()
g.DrawGeometry(geometry)
F#でWPF --- 好きな図形のコントロール作成
下記記事ではXAML上でPathを使って好きな図形を描きました。
XAMLで好きな形を描く - 何でもプログラミング
今回はコード側でコントロールを作成してみます。
作成する図形
Pathの時と同様の図形のコントロールを作成します。

DrawingVisual
Frameworkを継承し、内部でDrawingVisualを利用しています。
AddLogicalChild、AddVisualChildをすることにより、描画部分がマウスイベントを発行するようになります。
open System.Windows
open System.Windows.Media

type CustomShape() as this =
    inherit FrameworkElement()
    let visual = DrawingVisual()
    do  use g = visual.RenderOpen()
        let pen = Pen(Brushes.Red, 5.0)
        g.DrawLine(pen, Point(15.0, 15.0), Point(85.0, 85.0))
        g.DrawLine(pen, Point(85.0, 15.0), Point(15.0, 85.0))
        g.DrawEllipse(null, pen, Point(50.0, 50.0), 50.0, 50.0)

        this.AddLogicalChild(visual)
        this.AddVisualChild(visual)

    override this.VisualChildrenCount = 1

    override this.GetVisualChild _ = visual :> Visual
図形を動的に変更
依存プロパティ等によって図形を動的に変える場合、その都度RenderOpenしても更新されません。
間にDrawingGroupを挟むことにより可能となります。
コンストラクタ
let visual = DrawingVisual()
let group = DrawingGroup()
do  use g = visual.RenderOpen()
    g.DrawDrawing(group)
図形更新
use g = group.Open()
// g.Draw...
独自のヒットテスト
HitTestCoreをoverrideすることにより、独自のヒットテストを実行することができます。
有効の場合はPointHitTestResultを、無効の場合はnullを返します。
現在の実装のままではDrawingVisualがHitTestを処理してしまうため、新たにHitTestDisabledDrawingVisualを用意します。
AddLogicalChildとAddVisualChildはこの場合必要ありません。
type HitTestDisabledDrawingVisual() =
    inherit DrawingVisual()
    override this.HitTestCore(hitTestParameters : PointHitTestParameters) = null :> HitTestResult

type CustomShape() as this =
    inherit FrameworkElement()
    let visual = HitTestDisabledDrawingVisual()

    ...

    // this.AddLogicalChild(visual)
    // this.AddVisualChild(visual)

    ...

    override this.HitTestCore(hitTestParameters : PointHitTestParameters) =
        PointHitTestResult(this, hitTestParameters.HitPoint) :> HitTestResult
XAMLで好きな形を描く
WPFのShapeの一つにPathというものがあります。
名前だけだとPolylineのような感じがしますが、色々なものが描画できます。
パスマークアップ
HtmlのSVGでも採用されている図形描画用の構文です。
例えば以下の図形を描くには下記のようなコードになります。

<Path Data="M15,15 L85,85 M85,15 L15,85 M50,0 A50,50 0 0 0 50,100 A50,50 0 0 0 50,0" Stroke="Red" StrokeThickness="5" />
Dataの中身を詳しく
| M15,15 L85,85 (15, 15)へ移動して(85, 85)まで線を引く |
 |
| M85,15 L15,85 (85, 15)へ移動して(15, 85)まで線を引く |
 |
| M50,0 A50,50 0 0 0 50,100 (50, 0)へ移動して半径50の円弧を(50, 100)まで描く |
 |
| A50,50 0 0 0 50,0 現在の位置(50, 100)から半径50の円弧を(50, 0)まで描く |
 |
マウスイベント
マウスイベントも描画されたところのみ発行されるようになっています。
F#でWPF --- 階層構造表示
今回はTreeViewを利用して階層構造のデータを表示してみます。
HierarchicalDataTemplate
基本的にはDataTemplateにItemsSourceが加わったのものです。
ItemsSourceに子供の要素を保持しているプロパティをバインドします。
DataTemplateに関しては下記記事を参照してください。
F#でWPF --- 可変個のコントロール --- 型で生成するコントロールを変更 - 何でもプログラミング
<TreeView ItemsSource="{Binding Items}" Margin="10,10,10,35">
    <TreeView.Resources>
        <HierarchicalDataTemplate DataType="{x:Type MyClass}" ItemsSource="{Binding Children}">
            <!-- Control -->
        </HierarchicalDataTemplate>
    </TreeView.Resources>
</TreeView>
作成するアプリケーション
フォルダダイアログで選択したフォルダ内のファイル構造を表示するアプリケーションです。

File、Folder
DataTemplateで型で分岐させるため、ファイル及びフォルダの情報を持つクラスを定義します。
また階層構造を作成する関数も定義します。
namespace FileTree

[<AbstractClass>]
type FileOrFolder(name : string) =
    member this.Name = name

type File(name : string) =
    inherit FileOrFolder(name)

type Folder(name : string, children : FileOrFolder list) =
    inherit FileOrFolder(name)
    member this.Children = children

[<CompilationRepresentation (CompilationRepresentationFlags.ModuleSuffix)>]
module Folder =
    open System.IO
    let rec create path =
        let name = Path.GetFileName(path)
        let files =
            Directory.EnumerateFiles(path)
            |> Seq.map (Path.GetFileName >> File)
            |> Seq.cast<FileOrFolder>
        let folders =
            Directory.EnumerateDirectories(path)
            |> Seq.map create
            |> Seq.cast<FileOrFolder>
        Folder(name, files |> Seq.append folders |> Seq.toList)
アプリケーションコード
DataTemplateの時と同様に、Resourcesの中にHierarchicalDataTemplateを定義します。
ファイルとフォルダのアイコンは、Material Design Iconsのものを利用しています。
XAML内のFolderDialogActionは下記記事を参照してください。
F#でWPF --- フォルダダイアログCommand - 何でもプログラミング
F#内のDataContextクラスは下記記事を参照してください。
F#でWPF --- Elm Architectureを利用したMVVM - 何でもプログラミング
<Window xmlns="http://schemas.microsoft.com/winfx/2006/xaml/presentation"
        xmlns:i="clr-namespace:System.Windows.Interactivity;assembly=System.Windows.Interactivity"
        xmlns:local="clr-namespace:FileTree;assembly=FileTree"
        xmlns:x="http://schemas.microsoft.com/winfx/2006/xaml"
        Title="MainWindow" Height="200" Width="200">
    <Grid>
        <TreeView ItemsSource="{Binding FileOrFolders}" Margin="10,10,10,35">
            <TreeView.Resources>
                <HierarchicalDataTemplate DataType="{x:Type local:Folder}" ItemsSource="{Binding Children}">
                    <StackPanel Orientation="Horizontal">
                        <Viewbox Width="16" Height="16">
                            <Path Data="M20,18H4V8H20M20,6H12L10,4H4C2.89,4 2,4.89 2,6V18A2,2 0 0,0 4,20H20A2,2 0 0,0 22,18V8C22,6.89 21.1,6 20,6Z" Fill="Black" />
                        </Viewbox>
                        <TextBlock Text="{Binding Name}" Margin="5,0,0,0" />
                    </StackPanel>
                </HierarchicalDataTemplate>
                <DataTemplate DataType="{x:Type local:File}">
                    <StackPanel Orientation="Horizontal">
                        <Viewbox Width="16" Height="16">
                            <Path Data="M13,9H18.5L13,3.5V9M6,2H14L20,8V20A2,2 0 0,1 18,22H6C4.89,22 4,21.1 4,20V4C4,2.89 4.89,2 6,2M11,4H6V20H11L18,20V11H11V4Z" Fill="Black" />
                        </Viewbox>
                        <TextBlock Text="{Binding Name}" Margin="5,0,0,0" />
                    </StackPanel>
                </DataTemplate>
            </TreeView.Resources>
        </TreeView>
        <Button Content="フォルダを開く" HorizontalAlignment="Right" Margin="0,0,10,10" VerticalAlignment="Bottom" Width="75">
            <i:Interaction.Triggers>
                <i:EventTrigger EventName="Click">
                    <local:FolderDialogAction Command="{Binding OpenFolder}" />
                </i:EventTrigger>
            </i:Interaction.Triggers>
        </Button>
    </Grid>
</Window>
F#
open System
open System.Windows
open FileTree

type Msg = OpenFolder of string

type Model = { FileOrFolders : FileOrFolder list }

let initialModel = { FileOrFolders = [] }

let updateModel model msg =
    match msg with
    | OpenFolder x ->
        { model with FileOrFolders = [ Folder.create x ] }

[<STAThread>]
[<EntryPoint>]
let main argv =
    let window = Application.LoadComponent(Uri("MainWindow.xaml", UriKind.Relative)) :?> Window
    window.DataContext <- DataContext(initialModel, updateModel, id)
    Application().Run(window) |> ignore
    0
F#でWPF --- リストボックスCommand --- 複数選択
下記記事にてリストボックスで利用できるBehaviorを作成しました。
F#でWPF --- リストボックスCommand - 何でもプログラミング
今回はこれを拡張して、複数選択に対応させた実装をします。
ListBoxBehavior
単選択の時とほとんど同じです。
SelectedItemを利用していたのをSelectedItemsに変更しました。
SelectedItemsにsetterはないので、AddやClearでコレクションを変更します。
open System.Collections
open System.Windows.Input

type Item(name : obj) =
    override this.ToString() = name.ToString()

type ListBoxBehavior() =
    inherit BehaviorBase<ListBox>()

    static member val ItemsSourceProperty = DependencyProperty.Register("ItemsSource", typeof<IEnumerable>, typeof<ListBoxBehavior>)
    member this.ItemsSource with get()              = this.GetValue(ListBoxBehavior.ItemsSourceProperty) :?> IEnumerable
                            and  set(x:IEnumerable) = this.SetValue(ListBoxBehavior.ItemsSourceProperty, x)

    static member val SelectedIndicesProperty = DependencyProperty.Register("SelectedIndices", typeof<int list>, typeof<ListBoxBehavior>)
    member this.SelectedIndices with get()           = this.GetValue(ListBoxBehavior.SelectedIndicesProperty) :?> int list
                                and  set(x:int list) = this.SetValue(ListBoxBehavior.SelectedIndicesProperty, x)

    static member val CommandProperty = DependencyProperty.Register("Command", typeof<ICommand>, typeof<ListBoxBehavior>)
    member this.Command with get()           = this.GetValue(ListBoxBehavior.CommandProperty) :?> ICommand
                        and  set(x:ICommand) = this.SetValue(ListBoxBehavior.CommandProperty, x)

    override this.OnAttached control =
        let mutable items = []
        let mutable isUpdatingFromVM = false
        let getSelectedIndices() =
            control.SelectedItems
            |> Seq.cast<Item>
            |> Seq.choose (fun x -> List.tryFindIndex ((=) x) items)
            |> Seq.toList
        let setSelectedItems indices =
            control.SelectedItems.Clear()
            indices
            |> List.choose (fun x -> List.tryItem x items)
            |> List.iter (control.SelectedItems.Add >> ignore)
        [ DependencyProperty.changed<IEnumerable> ListBoxBehavior.ItemsSourceProperty this
          |> Observable.subscribe (fun x -> isUpdatingFromVM <- true
                                            let indices = getSelectedIndices()
                                            items <- x |> Seq.cast<obj> |> Seq.toList |> List.map Item
                                            control.ItemsSource <- items
                                            setSelectedItems indices
                                            isUpdatingFromVM <- false)
          DependencyProperty.changed<int list> ListBoxBehavior.SelectedIndicesProperty this
          |> Observable.subscribe (fun x -> isUpdatingFromVM <- true
                                            setSelectedItems x
                                            isUpdatingFromVM <- false)
          control.SelectionChanged.Subscribe(fun _ -> if (not isUpdatingFromVM) && (this.Command <> null) then
                                                        this.Command.Execute(getSelectedIndices())) ]
作成するアプリケーション
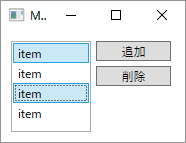
追加ボタンでリストが追加でき、削除ボタンで選択された複数のリストを削除できるアプリケーションです。

アプリケーションコード
こちらも単選択の時とほとんど同じです。
SelectedIndexをintからint listに変更しました。
リストボックスで複数選択を有効にするには、SelectionModeを変更します。
| Extended | Ctrlクリック、Shiftクリックで複数選択 |
| Multiple | クリックで複数選択 or 解除 |
<Window xmlns="http://schemas.microsoft.com/winfx/2006/xaml/presentation"
        xmlns:i="clr-namespace:System.Windows.Interactivity;assembly=System.Windows.Interactivity"
        xmlns:local="clr-namespace:Behaviors;assembly=ListBoxBehavior"
        xmlns:x="http://schemas.microsoft.com/winfx/2006/xaml"
        Title="MainWindow" Height="150" Width="200">
    <Grid>
        <ListBox Margin="10,10,0,10" HorizontalAlignment="Left" Width="80" SelectionMode="Extended">
            <i:Interaction.Behaviors>
                <local:ListBoxBehavior ItemsSource="{Binding Items}" SelectedIndices="{Binding SelectedIndices}" Command="{Binding SetSelectedIndices}" />
            </i:Interaction.Behaviors>
        </ListBox>
        <Button Command="{Binding AddItem}" Content="追加" HorizontalAlignment="Left" Margin="95,10,0,0" VerticalAlignment="Top" Width="75"/>
        <Button Command="{Binding RemoveSelectedItems}" Content="削除" HorizontalAlignment="Left" Margin="95,35,0,0" VerticalAlignment="Top" Width="75"/>
    </Grid>
</Window>
F#
open System
open System.Windows

type Msg =
    | AddItem
    | RemoveSelectedItems
    | SetSelectedIndices of int list

type Model =
    { Items           : string list
      SelectedIndices : int list }

let initialModel =
    { Items = []
      SelectedIndices = [] }

let updateModel model msg =
    match msg with
    | AddItem ->
        { model with Items = "item" :: model.Items }

    | RemoveSelectedItems ->
        { model with Items = model.Items
                             |> List.indexed
                             |> List.filter (fun (i, _) -> List.contains i model.SelectedIndices |> not)
                             |> List.map snd
                     SelectedIndices = [] }

    | SetSelectedIndices x ->
        { model with SelectedIndices = x }

[<STAThread>]
[<EntryPoint>]
let main argv =
    let window = Application.LoadComponent(Uri("MainWindow.xaml", UriKind.Relative)) :?> Window
    window.DataContext <- DataContext(initialModel, updateModel, id)
    Application().Run(window) |> ignore
    0
F#でWPF --- リストボックスCommand
今回はListBoxに、選択されたindexを送るCommandを実装します。
実装はBehaviorを利用して行います。
Behaviorの詳しい内容は下記記事を参照してください。
F#でWPF --- チェックボックスCommand --- Behavior利用 - 何でもプログラミング
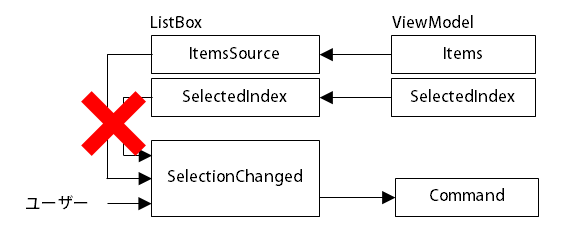
SelectionChanged
ListBoxにあるSelectionChangedイベントは、ユーザーからの入力以外でも発火することがあります。
今回はこれを回避するよう実装していきます。

SelectedItem、SelectedIndex、SelectedValue
ListBoxには現在の選択状態を示すのに、いくつかのプロパティが存在します。
その中で、SelectedItemをベースに作成してすれば不可解な挙動をしなくなると思います。
ListBoxBehavior
Item毎にインスタンスを変えるため(SelectedItemで判別するため)、独自のItemクラスでラップします。
ViewModelからの変更でSelectionChangedを発行しないよう、isUpdatingFromVMをフラグとして利用しています。
BehaviorBaseは下記記事を参照してください。
F#でWPF --- チェックボックスCommand --- Behavior利用 - 何でもプログラミング
DependencyProperty.changedは下記記事を参照してください。
F#でWPF --- テキストボックスCommand --- 1文字変更毎に発行 - 何でもプログラミング
open System.Collections
open System.Windows.Input

type Item(name : obj) =
    override this.ToString() = name.ToString()

type ListBoxBehavior() =
    inherit BehaviorBase<ListBox>()

    static member val ItemsSourceProperty = DependencyProperty.Register("ItemsSource", typeof<IEnumerable>, typeof<ListBoxBehavior>)
    member this.ItemsSource with get()              = this.GetValue(ListBoxBehavior.ItemsSourceProperty) :?> IEnumerable
                            and  set(x:IEnumerable) = this.SetValue(ListBoxBehavior.ItemsSourceProperty, x)

    static member val SelectedIndexProperty = DependencyProperty.Register("SelectedIndex", typeof<int>, typeof<ListBoxBehavior>)
    member this.SelectedIndex with get()      = this.GetValue(ListBoxBehavior.SelectedIndexProperty) :?> int
                              and  set(x:int) = this.SetValue(ListBoxBehavior.SelectedIndexProperty, x)

    static member val CommandProperty = DependencyProperty.Register("Command", typeof<ICommand>, typeof<ListBoxBehavior>)
    member this.Command with get()           = this.GetValue(ListBoxBehavior.CommandProperty) :?> ICommand
                        and  set(x:ICommand) = this.SetValue(ListBoxBehavior.CommandProperty, x)

    override this.OnAttached control =
        let mutable items = []
        let mutable isUpdatingFromVM = false
        let setSelectedItem index =
            if 0 <= index && index < items.Length then
                control.SelectedItem <- items.[index]
            else
                control.SelectedItem <- null
        [ DependencyProperty.changed<IEnumerable> ListBoxBehavior.ItemsSourceProperty this
          |> Observable.subscribe (fun x -> isUpdatingFromVM <- true
                                            let index = control.SelectedIndex
                                            items <- x |> Seq.cast<obj> |> Seq.toList |> List.map Item
                                            control.ItemsSource <- items
                                            setSelectedItem index
                                            isUpdatingFromVM <- false)
          DependencyProperty.changed<int> ListBoxBehavior.SelectedIndexProperty this
          |> Observable.subscribe (fun x -> isUpdatingFromVM <- true
                                            setSelectedItem x
                                            isUpdatingFromVM <- false)
          control.SelectionChanged.Subscribe(fun _ -> if (not isUpdatingFromVM) && (this.Command <> null) then
                                                        this.Command.Execute(control.SelectedIndex)) ]
作成するアプリケーション
追加、削除ボタンでリストを管理するアプリケーションです。

アプリケーションコード
F#で利用しているDataContextは下記記事を参照してください。
F#でWPF --- Elm Architectureを利用したMVVM - 何でもプログラミング
<Window xmlns="http://schemas.microsoft.com/winfx/2006/xaml/presentation"
        xmlns:i="clr-namespace:System.Windows.Interactivity;assembly=System.Windows.Interactivity"
        xmlns:local="clr-namespace:Behaviors;assembly=ListBoxBehavior"
        xmlns:x="http://schemas.microsoft.com/winfx/2006/xaml"
        Title="MainWindow" Height="150" Width="200">
    <Grid>
        <ListBox Margin="10,10,0,10" HorizontalAlignment="Left" Width="80">
            <i:Interaction.Behaviors>
                <local:ListBoxBehavior ItemsSource="{Binding Items}" SelectedIndex="{Binding SelectedIndex}" Command="{Binding SetSelectedIndex}" />
            </i:Interaction.Behaviors>
        </ListBox>
        <Button Command="{Binding AddItem}" Content="追加" HorizontalAlignment="Left" Margin="95,10,0,0" VerticalAlignment="Top" Width="75"/>
        <Button Command="{Binding RemoveSelectedItem}" Content="削除" HorizontalAlignment="Left" Margin="95,35,0,0" VerticalAlignment="Top" Width="75"/>
    </Grid>
</Window>
F#
open System
open System.Windows

type Msg =
    | AddItem
    | RemoveSelectedItem
    | SetSelectedIndex of int

type Model =
    { Items         : string list
      SelectedIndex : int }

let initialModel =
    { Items = []
      SelectedIndex = -1 }

let updateModel model msg =
    match msg with
    | AddItem ->
        { model with Items = "item" :: model.Items }

    | RemoveSelectedItem ->
        match model.SelectedIndex with
        | -1 -> model
        | x  -> let items = (model.Items |> List.take x) @ (model.Items |> List.skip (x + 1))
                { model with Items = items
                             SelectedIndex = min x (items.Length - 1) }

    | SetSelectedIndex x ->
        { model with SelectedIndex = x }

[<STAThread>]
[<EntryPoint>]
let main argv =
    let window = Application.LoadComponent(Uri("MainWindow.xaml", UriKind.Relative)) :?> Window
    window.DataContext <- DataContext(initialModel, updateModel, id)
    Application().Run(window) |> ignore
    0
F#でWPF --- フォルダダイアログCommand
下記記事にてOpenFileDialogに対応したActionを作成しました。
F#でWPF --- ファイルダイアログCommand - 何でもプログラミング
今回はフォルダを選択するダイアログに対応したActionを作成します。
作成するアプリケーション
ボタンを押してフォルダダイアログを開き、パスを選択するとテキストボックスにパスが表示されるアプリケーションを作成します。

参照の追加
今回はSystem.Windows.Forms.FolderBrowserDialogを利用するため、System.Windows.Forms.dllを参照に追加します。
System.Windows.FormsはWPFのコントロールと名前が衝突しやすいので、open System.Windows.Formsを利用しないことをお勧めします。

FolderDialogAction
ダイアログを開いたときに指定のフォルダが選択されているようにするには、SelectedPathにパスを設定しておきます。
namespace Actions

open System.Windows
open System.Windows.Input
open System.Windows.Interactivity

type FolderDialogAction() =
    inherit TriggerAction<FrameworkElement>()

    static member val CommandProperty = DependencyProperty.Register("Command", typeof<ICommand>, typeof<FolderDialogAction>)
    member this.Command with get()           = this.GetValue(FolderDialogAction.CommandProperty) :?> ICommand
                        and  set(x:ICommand) = this.SetValue(FolderDialogAction.CommandProperty, x)

    static member val InitialPathProperty = DependencyProperty.Register("InitialPath", typeof<string>, typeof<FolderDialogAction>)
    member this.InitialPath with get()         = this.GetValue(FolderDialogAction.InitialPathProperty) :?> string
                            and  set(x:string) = this.SetValue(FolderDialogAction.InitialPathProperty, x)

    override this.Invoke parameter =
        use dialog = new System.Windows.Forms.FolderBrowserDialog(SelectedPath = this.InitialPath)
        if dialog.ShowDialog() = System.Windows.Forms.DialogResult.OK && this.Command <> null then
            this.Command.Execute dialog.SelectedPath
アプリケーションコード
F#側はファイルダイアログCommandの時と同じです。
<Window xmlns="http://schemas.microsoft.com/winfx/2006/xaml/presentation"
        xmlns:i="clr-namespace:System.Windows.Interactivity;assembly=System.Windows.Interactivity"
        xmlns:local="clr-namespace:Actions;assembly=FolderDialogAction"
        Title="MainWindow" Height="80" Width="300">
    <Grid>
        <Button Content="フォルダダイアログ" HorizontalAlignment="Left" Margin="10,10,0,0" VerticalAlignment="Top" Width="100">
            <i:Interaction.Triggers>
                <i:EventTrigger EventName="Click">
                    <local:FolderDialogAction Command="{Binding SetPath}" InitialPath="C:\src" />
                </i:EventTrigger>
            </i:Interaction.Triggers>
        </Button>
        <TextBlock Text="{Binding Path}" HorizontalAlignment="Left" Margin="115,10,0,0" TextWrapping="Wrap" VerticalAlignment="Top"/>
    </Grid>
</Window>