WebGL(TypeScript)--- 立方体描画&回転
下記記事にて、WebGLを用いて三角形を描画しました。
WebGL(TypeScript)--- 三角形描画 - 何でもプログラミング
今回は引き続き、立方体を描画&回転を実装してみたいと思います。
上記記事をベースに実装していきますので、解説のない部分は参照をお願いいたします。
Index Buffer作成関数
今回はIndex Bufferを用いて描画を行ってみたいと思います。
ですので、作成関数を準備します。
function createIndexBuffer(gl : WebGLRenderingContext, indices : number[]) : WebGLBuffer {
    const buffer = gl.createBuffer()!;

    gl.bindBuffer(gl.ELEMENT_ARRAY_BUFFER, buffer);
    gl.bufferData(gl.ELEMENT_ARRAY_BUFFER, new Uint16Array(indices), gl.STATIC_DRAW);

    return buffer;
}
Matrix4クラス
回転を実現するため、最低限の行列クラスを準備します。
回転行列を作成するrotate関数、転置を行うtranspose関数(WebGLは列優先のため)、左上の3x3行列を取り出すgetMatrix3Data関数(法線変換用)を定義しています。
class Matrix4 {
    constructor(readonly data: number[]) { }

    transposed() : Matrix4 {
        return new Matrix4([
            this.data[0], this.data[4], this.data[8],  this.data[12],
            this.data[1], this.data[5], this.data[9],  this.data[13],
            this.data[2], this.data[6], this.data[10], this.data[14],
            this.data[3], this.data[7], this.data[11], this.data[15],
        ]);
    }

    getMatrix3Data() : number[] {
        return [
            this.data[0], this.data[1], this.data[2],
            this.data[4], this.data[5], this.data[6],
            this.data[8], this.data[9], this.data[10],
        ];
    }

    static rotate(degree : number, x : number, y : number, z : number) : Matrix4 {
        const length = Math.sqrt(x * x + y * y + z * z);
        x /= length;
        y /= length;
        z /= length;
        const radian = degree * Math.PI / 180.0;
        const s = Math.sin(radian);
        const c = Math.cos(radian);
        return new Matrix4([
            x * x * (1 - c) + c,     x * y * (1 - c) - z * s, z * x * (1 - c) + y * s, 0,
            x * y * (1 - c) + z * s, y * y * (1 - c) + c,     y * z * (1 - c) - x * s, 0,
            z * x * (1 - c) - y * s, y * z * (1 - c) + x * s, z * z * (1 - c) + c,     0,
            0,                       0,                       0,                       1
        ]);
    }
}
main関数
ライティングを行うShaderの作成と、立方体のVertex Buffer&Index Bufferの作成を行い、requestAnimationFrameにて回転させつつ描画を行っています。
実行すると下記のような表示になります。(実際はアニメーションします。)

let gl : WebGLRenderingContext;

function main() : void {
    const canvas = <HTMLCanvasElement>document.getElementById("gl");
    gl = canvas.getContext("webgl")!;

    // Vertex Shader(頂点と法線を変換して次へ)
    const vertexCode = `
        attribute vec4 position;
        attribute vec3 normal;
        uniform mat4 matrix;
        uniform mat3 normalMatrix;
        varying vec3 v_normal;
        void main() {
            gl_Position = matrix * position;
            v_normal = normalMatrix * normal;
        }
    `;

    // Fragment Shader(ライティングを行って描画)
    const fragmentCode = `
        precision mediump float;
        varying vec3 v_normal;
        void main() {
            vec3 light = vec3(0.0, 0.0, -1.0);
            float g = dot(light, normalize(v_normal));
            g = max(0.0, g);
            gl_FragColor = vec4(0.0, g, 0.0, 1.0);
        }
    `;

    const program = createProgram(gl, vertexCode, fragmentCode);

    // 立方体定義(頂点、法線)
    const vertices = [
         0.5,  0.5,  0.5,    0.0,  0.0,  1.0,
        -0.5,  0.5,  0.5,    0.0,  0.0,  1.0,
         0.5, -0.5,  0.5,    0.0,  0.0,  1.0,
        -0.5, -0.5,  0.5,    0.0,  0.0,  1.0,

         0.5,  0.5, -0.5,    0.0,  0.0, -1.0,
        -0.5,  0.5, -0.5,    0.0,  0.0, -1.0,
         0.5, -0.5, -0.5,    0.0,  0.0, -1.0,
        -0.5, -0.5, -0.5,    0.0,  0.0, -1.0,

         0.5,  0.5,  0.5,    1.0,  0.0,  0.0,
         0.5, -0.5,  0.5,    1.0,  0.0,  0.0,
         0.5,  0.5, -0.5,    1.0,  0.0,  0.0,
         0.5, -0.5, -0.5,    1.0,  0.0,  0.0,

        -0.5,  0.5,  0.5,   -1.0,  0.0,  0.0,
        -0.5, -0.5,  0.5,   -1.0,  0.0,  0.0,
        -0.5,  0.5, -0.5,   -1.0,  0.0,  0.0,
        -0.5, -0.5, -0.5,   -1.0,  0.0,  0.0,

         0.5,  0.5,  0.5,    0.0,  1.0,  0.0,
         0.5,  0.5, -0.5,    0.0,  1.0,  0.0,
        -0.5,  0.5,  0.5,    0.0,  1.0,  0.0,
        -0.5,  0.5, -0.5,    0.0,  1.0,  0.0,

         0.5, -0.5,  0.5,    0.0, -1.0,  0.0,
         0.5, -0.5, -0.5,    0.0, -1.0,  0.0,
        -0.5, -0.5,  0.5,    0.0, -1.0,  0.0,
        -0.5, -0.5, -0.5,    0.0, -1.0,  0.0,
    ];
    const vertexBuffer = createVertexBuffer(gl, vertices);

    const indices = [
        0,  2,  1,
        1,  2,  3,
        4,  5,  6,
        5,  7,  6,

        8,  10, 9,
        9,  10, 11,
        12, 13, 14,
        13, 15, 14,

        16, 18, 17,
        17, 18, 19,
        20, 21, 22,
        21, 23, 22,
    ];
    const indexBuffer = createIndexBuffer(gl, indices);

    // 初期設定
    gl.useProgram(program);
    const positionAttrib = gl.getAttribLocation(program, "position");
    const normalAttrib = gl.getAttribLocation(program, "normal");
    const matrixUniform = gl.getUniformLocation(program, "matrix")!;
    const normalMatrixUniform = gl.getUniformLocation(program, "normalMatrix")!;

    gl.bindBuffer(gl.ARRAY_BUFFER, vertexBuffer);
    gl.enableVertexAttribArray(positionAttrib);
    gl.enableVertexAttribArray(normalAttrib);
    gl.vertexAttribPointer(positionAttrib, 3, gl.FLOAT, false, 24, 0);
    gl.vertexAttribPointer(normalAttrib, 3, gl.FLOAT, false, 24, 12);

    gl.bindBuffer(gl.ELEMENT_ARRAY_BUFFER, indexBuffer);

    gl.enable(gl.DEPTH_TEST);
    gl.enable(gl.CULL_FACE); // デフォルトで反時計回りが表

    // 描画関数
    let rotation = 0;
    function step(time : number) : void {
        rotation++;

        const mat = Matrix4.rotate(rotation, 1, 1, 1).transposed();
        gl.uniformMatrix4fv(matrixUniform, false, mat.data);
        gl.uniformMatrix3fv(normalMatrixUniform, false, mat.getMatrix3Data());

        gl.clearColor(0.8, 0.8, 0.8, 1);
        gl.clear(gl.COLOR_BUFFER_BIT);
        gl.drawElements(gl.TRIANGLES, indices.length, gl.UNSIGNED_SHORT, 0);

        requestAnimationFrame(step);
    }
    // 描画スタート
    requestAnimationFrame(step);
}

main();
WebGL(TypeScript)--- 三角形描画
今回はWebGLを用いてcanvasに三角形を描画してみたいと思います。
ライブラリを用いず、一から実装してみます。
HTMLの準備
表示のため、下記htmlを用意しました。
<!DOCTYPE html>
<html>
  <body>
    <canvas id="gl_canvas" width="100" height="100"></canvas>
    <script src="script.js"></script>
  </body>
</html>
Shader作成関数
Vertex ShaderのコードとFragment Shaderのコードから、WebGLProgramを作成する関数を準備します。
function createProgram(gl : WebGLRenderingContext, vertexCode : string, fragmentCode : string) : WebGLProgram {
    // Vertex Shader コンパイル
    const vertexShader = gl.createShader(gl.VERTEX_SHADER)!;
    compileShader(gl, vertexShader, vertexCode);

    // Fragment Shader コンパイル
    const fragmentShader = gl.createShader(gl.FRAGMENT_SHADER)!;
    compileShader(gl, fragmentShader, fragmentCode);

    // Program作成
    const program = gl.createProgram()!;
    gl.attachShader(program, vertexShader);
    gl.attachShader(program, fragmentShader);
    gl.linkProgram(program);

    // エラー確認
    console.log(gl.getProgramInfoLog(program));
    if (!gl.getProgramParameter(program, gl.LINK_STATUS))
        throw new Error("program error");

    return program;
}
上記で利用しているcompileShaderは次のようになります。
function compileShader(gl : WebGLRenderingContext, shader : WebGLShader, code : string) : void {
    gl.shaderSource(shader, code);
    gl.compileShader(shader);

    // エラー確認
    console.log(gl.getShaderInfoLog(shader));
    if (!gl.getShaderParameter(shader, gl.COMPILE_STATUS))
        throw new Error("compile error");
}
VertexBuffer作成関数
頂点データの配列からWebGLBufferを作成する関数を準備します。
function createVertexBuffer(gl : WebGLRenderingContext, vertices : number[]) : WebGLBuffer {
    const buffer = gl.createBuffer()!;

    gl.bindBuffer(gl.ARRAY_BUFFER, buffer);
    gl.bufferData(gl.ARRAY_BUFFER, new Float32Array(vertices), gl.STATIC_DRAW);

    return buffer;
}
main関数
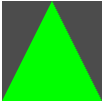
三角形を描画する関数は下記の様になります。
canvasにはこのように描画されます。

let gl : WebGLRenderingContext;

function main() : void {
    const canvas = <HTMLCanvasElement>document.getElementById("gl_canvas");
    gl = canvas.getContext("webgl")!;

    const vertexCode = `
        attribute vec4 position;
        void main() {
            gl_Position = position;
        }
    `;

    const fragmentCode = `
        void main() {
            gl_FragColor = vec4(0.0, 1.0, 0.0, 1.0);
        }
    `;

    const program = createProgram(gl, vertexCode, fragmentCode);

    const vertices = [
         0.0,  1.0, 0.0,
        -1.0, -1.0, 0.0,
         1.0, -1.0, 0.0,
    ];
    const vertexBuffer = createVertexBuffer(gl, vertices);

    gl.useProgram(program);
    const positionAttrib = gl.getAttribLocation(program, "position");
    gl.enableVertexAttribArray(positionAttrib);
    gl.bindBuffer(gl.ARRAY_BUFFER, vertexBuffer);
    gl.vertexAttribPointer(positionAttrib, 3, gl.FLOAT, false, 0, 0);

    gl.clearColor(0.3, 0.3, 0.3, 1);
    gl.clear(gl.COLOR_BUFFER_BIT);
    gl.drawArrays(gl.TRIANGLES, 0, 3);
}

main();
Direct2D --- 画像読み込み
Direct2Dにおいて画像ファイルを読み込んで表示する場合、Windows Imaging Component (WIC)を利用します。
今回は実際にそれを実装してみたいと思います。
画像ファイルを32bitRGBAで読み込み
まずIWICImagingFactoryを作成し、factory経由でデコードを行います。
また32bitRGBAに変換するため、IWICFormatConverterを利用します。
#include <wincodec.h>
#include <wrl\client.h>
using namespace Microsoft::WRL;

ComPtr<IWICBitmapSource> WICBitmapFromFile(wchar_t* path)
{
    ComPtr<IWICImagingFactory> factory;
    AssertHR(CoCreateInstance(
        CLSID_WICImagingFactory,
        NULL,
        CLSCTX_INPROC_SERVER,
        IID_PPV_ARGS(&factory)
    ));

    ComPtr<IWICBitmapDecoder> decoder;
    AssertHR(factory->CreateDecoderFromFilename(
        path,
        NULL,
        GENERIC_READ,
        WICDecodeMetadataCacheOnDemand,
        &decoder
    ));

    ComPtr<IWICBitmapFrameDecode> frame;
    AssertHR(decoder->GetFrame(0, &frame));

    // 32bit RGBAに変換
    ComPtr<IWICFormatConverter> converter;
    AssertHR(factory->CreateFormatConverter(&converter));
    AssertHR(converter->Initialize(
        frame.Get(),
        GUID_WICPixelFormat32bppPBGRA,
        WICBitmapDitherTypeNone,
        NULL,
        0.0f,
        WICBitmapPaletteTypeCustom
    ));

    return converter;
}
Direct2Dアプリケーションで利用
ID2D1RenderTargetのDrawBitmapを利用して描画します。
ComPtr<ID2D1Bitmap> image = WICBitmapFromFile(L"Parrots.bmp");
renderTarget->DrawBitmap(image.Get(), D2D1::RectF(0, 0, width, height));
ただしWICを利用するに際し、アプリケーションの始めにCoInitializeを呼んでおく必要があります。
AssertHR(CoInitialize(NULL));
...
CoUninitialize();
Direct2Dの基本的な使い方は下記を参照してみてください。
Direct2D導入(ID2D1HwndRenderTarget) - 何でもプログラミング
Direct2D導入(ID2D1DeviceContext) - 何でもプログラミング
SDL導入
画像処理コードの確認の際、C++で簡単にウィンドウを表示したいと思い、SDLを少し使ってみました。
SDLダウンロード
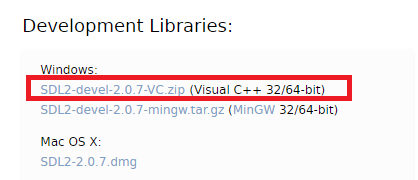
下記ページよりdllをダウンロードします。
Simple DirectMedia Layer - SDL version 2.0.7 (stable)

shared_ptrに変換する関数定義(任意)
SDLはCのライブラリのため、ポインタの開放は手動でやる必要があります。(例:SDL_CreateWindow → SDL_DestroyWindow)
ポインタの管理を楽にするため、shared_ptrに変換する関数を準備します。
shared_ptr作成時に対応するデストラクタを渡すようにしています。
#define DEEFINE_TO_SHARED_PTR(type, destructor) std::shared_ptr<type> ToSharedPtr(type* p) { return std::shared_ptr<type>(p, destructor); }
DEEFINE_TO_SHARED_PTR(SDL_Window,   SDL_DestroyWindow)
DEEFINE_TO_SHARED_PTR(SDL_Renderer, SDL_DestroyRenderer)
DEEFINE_TO_SHARED_PTR(SDL_Surface,  SDL_FreeSurface)
DEEFINE_TO_SHARED_PTR(SDL_Texture,  SDL_DestroyTexture)
簡単な実装
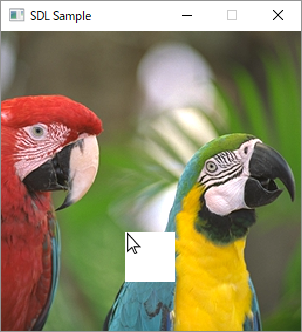
画像を読み込んで表示するアプリケーションを実装してみます。
ついでにマウスの位置に正方形も描画してみます。

#include <SDL.h>
#pragma comment(lib, "SDL2.lib")
#pragma comment(lib, "SDL2main.lib")

int main(int, char**)
{
    SDL_assert(SDL_Init(SDL_INIT_VIDEO) == 0);

    std::shared_ptr<SDL_Window> window = ToSharedPtr(SDL_CreateWindow(
        "SDL Sample",
        SDL_WINDOWPOS_UNDEFINED,
        SDL_WINDOWPOS_UNDEFINED,
        640,
        480,
        0
    ));
    SDL_assert(window);

    std::shared_ptr<SDL_Renderer> renderer = ToSharedPtr(SDL_CreateRenderer(window.get(), -1, 0));
    SDL_assert(renderer);

    std::shared_ptr<SDL_Surface> surface = ToSharedPtr(SDL_LoadBMP("Parrots.bmp"));
    SDL_assert(surface);

    std::shared_ptr<SDL_Texture> texture = ToSharedPtr(SDL_CreateTextureFromSurface(renderer.get(), surface.get()));
    SDL_assert(texture);

    while (1)
    {
        SDL_Event event;
        if (SDL_PollEvent(&event) == 0)
            continue;

        if (event.type == SDL_QUIT)
            break;
        else if (event.type == SDL_MOUSEMOTION)
        {
            SDL_assert(SDL_RenderClear(renderer.get()) == 0);

            // 画像描画
            SDL_assert(SDL_RenderCopy(renderer.get(), texture.get(), nullptr, nullptr) == 0);

            // マウスの位置に正方形描画
            SDL_Rect rect = { event.motion.x, event.motion.y, 50, 50 };
            SDL_assert(SDL_SetRenderDrawColor(renderer.get(), 255, 255, 255, 255) == 0);
            SDL_assert(SDL_RenderFillRect(renderer.get(), &rect) == 0);

            SDL_RenderPresent(renderer.get());
        }
    }

    SDL_Quit();

    return 0;
}
複数のキーを利用できるConditionalWeakTableクラス
下記記事にて、2つのキーを利用できるWeakTableを実装してみました。
2つのキーを利用できるConditionalWeakTableクラス - 何でもプログラミング
今回は3,4個と拡張しやすいように、複数個のキーを利用できるWeakTableを実装してみたいと思います。
Keysクラス
前回は2つのWeakReferenceプロパティをもっていましたが、今回はWeakReference配列を扱うよう変更しました。
EqualsとGetHashCodeを、WeakReferenceではなくTargetで行うところは変わっていません。
class Keys
{
    public WeakReference[] WeakKeys { get; }
    int _hash;

    public bool IsAlive()
    {
        return WeakKeys.All(x => x.IsAlive);
    }

    public Keys(object[] keys)
    {
        WeakKeys = keys.Select(x => new WeakReference(x)).ToArray();

        _hash = keys.Aggregate(365011897, (hash, key) => hash * -1521134295 + key.GetHashCode());
    }

    public override bool Equals(object obj)
    {
        var keys = obj as Keys;
        return keys != null
            && WeakKeys.Length == keys.WeakKeys.Length
            && WeakKeys.Zip(keys.WeakKeys, TargetEquals).All(x => x);
    }

    bool TargetEquals(WeakReference weakRef1, WeakReference weakRef2)
    {
        var ref1 = weakRef1.Target;
        var ref2 = weakRef2.Target;
        return ref1 != null
            && ref2 != null
            && Equals(ref1, ref2);
    }

    public override int GetHashCode()
    {
        return _hash;
    }
}
WeakTableクラス
まず、一般的はkey配列に対応したクラスを作成します。
class WeakTable<TValue>
{
    object _lockObj = new object();
    Dictionary<Keys, TValue> _dictionary = new Dictionary<Keys, TValue>();
    public WeakTable()
    {
        WeakEventManager<GCNotifier, EventArgs>.AddHandler(null, nameof(GCNotifier.Collected),
            (s, e) => CheckReferences());
    }

    public void Add(object[] keys, TValue value)
    {
        lock (_lockObj)
        {
            _dictionary[new Keys(keys)] = value;
        }
    }

    public bool TryGetValue(object[] keys, ref TValue value)
    {
        lock (_lockObj)
        {
            var key = new Keys(keys);
            if (_dictionary.ContainsKey(key) == false)
                return false;
            value = _dictionary[key];
            return true;
        }
    }

    public void CheckReferences()
    {
        lock (_lockObj)
        {
            _dictionary = _dictionary
                .Where(x => x.Key.IsAlive())
                .ToDictionary(x => x.Key, x => x.Value);
        }
    }
}
これを利用して、例えば2つのキーのWeakTableは下記のように定義します。
class WeakTable<TKey1, TKey2, TValue>
    where TKey1 : class
    where TKey2 : class
{
    WeakTable<TValue> _table = new WeakTable<TValue>();

    public void Add(TKey1 key1, TKey2 key2, TValue value) =>
        _table.Add(new object[] { key1, key2 }, value);

    public bool TryGetValue(TKey1 key1, TKey2 key2, ref TValue value) =>
        _table.TryGetValue(new object[] { key1, key2 }, ref value);
}
2つのキーを利用できるConditionalWeakTableクラス
.NETのConditionalWeakTableは、キーを弱参照で保持し、キーがGCされたときに自動でキーと値がRemoveされるようになっています。
しかし、キーとして複数の参照を持ち、参照のうちどれかがGCされたらRemoveを行うといった使い方はできません。
今回は複数の参照キーを指定できるConditionalWeakTableのようなものを実装してみたいと思います。
ConditionalWeakTableの中身
内部的にDependentHandleという構造体で管理しているようですが、privateのため利用できません。
Ephemeronというデータ構造を利用しているらしいですが、詳しくは追及していません。
2つのキーを弱参照で保持するクラス
Keyを弱参照で保持し、EqualsやGetHashCodeをもともとのKeyから算出するクラスを作成します。
class Keys
{
    public WeakReference<TKey1> Key1 { get; }
    public WeakReference<TKey2> Key2 { get; }
    int _hash;

    public bool IsAlive()
    {
        return Key1.TryGetTarget(out var key1)
            && Key2.TryGetTarget(out var key2);
    }

    public Keys(TKey1 key1, TKey2 key2)
    {
        Key1 = new WeakReference<TKey1>(key1);
        Key2 = new WeakReference<TKey2>(key2);

        // WeakReferenceではなく、もとのkeyからhash作成
        _hash = 365011897;
        _hash = _hash * -1521134295 + key1.GetHashCode();
        _hash = _hash * -1521134295 + key2.GetHashCode();
    }

    public override bool Equals(object obj)
    {
        // WeakReferenceの比較ではなく、中身の参照の比較
        var keys = obj as Keys;
        return keys != null
            && TargetEquals(Key1, keys.Key1)
            && TargetEquals(Key2, keys.Key2);
    }

    bool TargetEquals<T>(WeakReference<T> weakRef1, WeakReference<T> weakRef2)
        where T : class
    {
        return weakRef1.TryGetTarget(out var ref1)
            && weakRef2.TryGetTarget(out var ref2)
            && Equals(ref1, ref2);
    }

    public override int GetHashCode()
    {
        return _hash;
    }
}
WeakTableクラス
上記のKeysクラスを利用して、WeakTable本体を実装していきます。
class WeakTable<TKey1, TKey2, TValue>
    where TKey1 : class
    where TKey2 : class
{
    Dictionary<Keys, TValue> _dictionary = new Dictionary<Keys, TValue>();

    public void Add(TKey1 key1, TKey2 key2, TValue value)
    {
        _dictionary[new Keys(key1, key2)] = value;
    }

    public bool TryGetValue(TKey1 key1, TKey2 key2, ref TValue value)
    {
        var key = new Keys(key1, key2);
        if (_dictionary.ContainsKey(key) == false)
            return false;
        value = _dictionary[key];
        return true;
    }

    public void CheckReferences()
    {
        // 不必要なレコードを削除
        _dictionary = _dictionary
            .Where(x => x.Key.IsAlive())
            .ToDictionary(x => x.Key, x => x.Value);
    }
}
GCが行われたときにCheckReferencesを呼ぶ
現状のままでは、利用者がCheckReferencesを呼ばないと不必要なレコードが解放されないので、GC時に呼ばれるよう実装してみます。
GCの検知の詳細は下記記事を参照してみてください。
Garbage Collectionを検知する(C#) - 何でもプログラミング
今回はこのようなクラスを用意しました。
class GCNotifier
{
    public static event EventHandler Collected;

    static GCNotifier()
    {
        new DummyObject();
    }

    class DummyObject
    {
        ~DummyObject()
        {
            if (!AppDomain.CurrentDomain.IsFinalizingForUnload()
            && !Environment.HasShutdownStarted)
            {
                Collected?.Invoke(null, EventArgs.Empty);
                new DummyObject();
            }
        }
    }
}
GCNotifierを利用して、WeakTableに実装を追加します。
WeakEventManagerでCollectedにアタッチし、lock機構を追加しています。
class WeakTable<TKey1, TKey2, TValue>
    where TKey1 : class
    where TKey2 : class
{
    object _lockObj = new object();
    Dictionary<Keys, TValue> _dictionary = new Dictionary<Keys, TValue>();

    public WeakTable()
    {
        WeakEventManager<GCNotifier, EventArgs>.AddHandler(null, nameof(GCNotifier.Collected),
            (s, e) => CheckReferences());
    }

    public void Add(TKey1 key1, TKey2 key2, TValue value)
    {
        lock (_lockObj)
        {
            _dictionary[new Keys(key1, key2)] = value;
        }
    }

    public bool TryGetValue(TKey1 key1, TKey2 key2, ref TValue value)
    {
        lock (_lockObj)
        {
            var key = new Keys(key1, key2);
            if (_dictionary.ContainsKey(key) == false)
                return false;
            value = _dictionary[key];
            return true;
        }
    }

    public void CheckReferences()
    {
        lock (_lockObj)
        {
            _dictionary = _dictionary
                .Where(x => x.Key.IsAlive())
                .ToDictionary(x => x.Key, x => x.Value);
        }
    }
}
Garbage Collectionを検知する(C#)
通常のプログラミングにおいて、いつGCされたか気にする必要はありませんが、極まれにGCのタイミングで処理をしたい時があります(設計で回避するべきではありますが…)
今回はGCを検知する方法を調べてみました。
GC.WaitForFullGCComplete
GCクラスの関数を利用する方法です。
これを利用するには、App.configで下記が指定されている必要があります。(コンカレントGCを無効化)
<configuration>
  <runtime>
    <gcConcurrent enabled="false" />
  </runtime>
</configuration>
GCNotifierクラスを定義してみます。
GC.RegisterForFullGCNotificationで通知を有効化し、GC.WaitForFullGCApproachとGC.WaitForFullGCCompleteで通知を待ちます。
GC.RegisterForFullGCNotificationの引数は、大きいほど通知を受け取りやすくなるそうです。
static class GCNotifier
{
    public static event Action Collected;
    public static void Start()
    {
        GC.RegisterForFullGCNotification(10, 10);
        Task.Run(() =>
        {
            while (true)
            {
                GC.WaitForFullGCApproach();
                if (GC.WaitForFullGCComplete() == GCNotificationStatus.Succeeded)
                    Collected?.Invoke();
            }
        });
    }
}
利用は下記のようになります。
GCNotifier.Collected += () => Console.WriteLine("collected");
GCNotifier.Start();
Finalizeを利用
下記のものを簡略化してみます。
Jeffrey Richter: Receiving notifications when garbage collections occur – Microsoft Press blog
DummyクラスのFinalizeでコールバックを呼び、さらに新しいDummyオブジェクトを生成しています。
GCNotifierクラスは下記のようになり、利用方法はGC.WaitForFullGCCompleteの時と同じです。
static class GCNotifier
{
    public static event Action Collected;
    public static void Start()
    {
        new DummyObject();
    }
    class DummyObject
    {
        ~DummyObject()
        {
            if (!AppDomain.CurrentDomain.IsFinalizingForUnload()
            &&  !Environment.HasShutdownStarted)
            {
                Collected?.Invoke();
                new DummyObject();
            }
        }
    }
}