F#でWPF --- UI画像キャプチャ
今回は、表示されているWPFコントロールを画像として保存する方法を書いていきます。
F#でWPFを利用する方法は下記記事を参照してください。
F#でWPF --- ウィンドウ表示 - 何でもプログラミング
作成するアプリケーション
キャプチャボタンを押すと、Gridの内部がpngで保存されるアプリケーションを作成します。

SaveImageAction
今回はTriggerActionを利用して実装していきます。
TargetにバインドされたFrameworkElementをPNG画像として出力します。
FrameworkElementからBitmapにするにはRenderTargetBitmapを利用します。
Measure、Arrange、UpdateLayoutを呼んでコントロールを希望のサイズに更新します。場合によって全部呼ぶ必要がないケースもありますが、セットにして記述しておく方が楽です。
BitmapをPNGで保存するにはPngBitmapEncoder利用します。
open System.IO
open System.Windows
open System.Windows.Media
open System.Windows.Media.Imaging
open System.Windows.Interactivity
open Microsoft.Win32
open Microsoft.FSharp.Linq.NullableOperators

type SaveImageAction() =
    inherit TriggerAction<FrameworkElement>()

    static member val TargetProperty = DependencyProperty.Register("Target", typeof<FrameworkElement>, typeof<SaveImageAction>)
    member this.Target with get()                   = this.GetValue(SaveImageAction.TargetProperty) :?> FrameworkElement
                       and  set(x:FrameworkElement) = this.SetValue(SaveImageAction.TargetProperty, x)

    override this.Invoke _ =
        let dialog = SaveFileDialog(Filter = "PNGファイル|*.png")
        if this.Target <> null && dialog.ShowDialog() ?= true then
            let width  = this.Target.ActualWidth
            let height = this.Target.ActualHeight
            let bmp = RenderTargetBitmap(int width, int height, 96.0, 96.0, PixelFormats.Pbgra32)
            this.Target.Measure(Size(width, height))
            this.Target.Arrange(Rect(0.0, 0.0, width, height))
            this.Target.UpdateLayout()
            bmp.Render(this.Target)

            let pngEncoder = PngBitmapEncoder()
            pngEncoder.Frames.Add(BitmapFrame.Create(bmp))
            use writer = new StreamWriter(dialog.FileName)
            pngEncoder.Save(writer.BaseStream)
アプリケーションコード
BindingでPathを設定しないと、コントロールそのものを渡すことができます。
<Window xmlns="http://schemas.microsoft.com/winfx/2006/xaml/presentation"
        xmlns:x="http://schemas.microsoft.com/winfx/2006/xaml"
        xmlns:i="clr-namespace:System.Windows.Interactivity;assembly=System.Windows.Interactivity"
        xmlns:local="clr-namespace:Actions;assembly=SaveWpfImage"
        Title="MainWindow" Height="100" Width="200">
    <Grid x:Name="grid" Background="CornflowerBlue">
        <Button Content="キャプチャ" HorizontalAlignment="Left" Margin="55,20,0,0" VerticalAlignment="Top" Width="75">
            <i:Interaction.Triggers>
                <i:EventTrigger EventName="Click">
                    <local:SaveImageAction Target="{Binding ElementName=grid}" />
                </i:EventTrigger>
            </i:Interaction.Triggers>
        </Button>
    </Grid>
</Window>
F#
open System
open System.Windows

[<STAThread>]
[<EntryPoint>]
let main argv =
    let window = Application.LoadComponent(Uri("MainWindow.xaml", UriKind.Relative)) :?> Window
    Application().Run(window) |> ignore
    0
F#でWPF --- メッセージボックス --- System.Windows.MessageBox不使用
下記記事において、MVVMにおけるメッセージボックス表示の実装を行いました。
F#でWPF --- ファイルダイアログCommand - 何でもプログラミング
上記記事での実装は、stringの値にバインドしているというよりは、stringの変化のトリガーに引っかけて動作しているものでした。
今回は変数変更のトリガーではなく、変数の状態に基づいてメッセージボックスを表示するよう実装してみます。
作成するアプリケーション
メッセージボタンを押すとメッセージ領域が表示されるアプリケーションを作成します。

アプリケーションコード
前回と比較して、IsMessageVisibleが追加されました。
type Model =
    { Message          : string
      IsMessageVisible : bool }

let initialModel =
    { Message = ""
      IsMessageVisible = false }

type Msg =
    | ShowMessage
    | CloseMessage

let updateModel model msg =
    match msg with
    | ShowMessage ->
        { model with Message = "Hello"
                     IsMessageVisible = true }

    | CloseMessage ->
        { model with Message = ""
                     IsMessageVisible = false }

[<STAThread>]
[<EntryPoint>]
let main argv =
    let window = Application.LoadComponent(Uri("MainWindow.xaml", UriKind.Relative)) :?> Window
    window.DataContext <- DataContext(initialModel, updateModel, id)
    Application().Run(window) |> ignore
    0
MainWindow.xaml
一番外側をMessageBoxPresenterで囲っています。
MessageBoxPresenterは後程説明します。
<Window xmlns="http://schemas.microsoft.com/winfx/2006/xaml/presentation"
        xmlns:local="clr-namespace:MessageBox;assembly=MessageBox"
        Title="MainWindow" Height="200" Width="200">
    <local:MessageBoxPresenter ClosedCommand="{Binding CloseMessage}" IsOpen="{Binding IsMessageVisible}" Text="{Binding Message}">
        <Grid>
            <Button Content="メッセージボックス" Command="{Binding ShowMessage}" HorizontalAlignment="Right" Margin="0,0,10,10" VerticalAlignment="Bottom" Width="100" />
        </Grid>
    </local:MessageBoxPresenter>
</Window>
MessageBoxPresenter
ContentProperty属性を付けることにより、子要素(MainWindow.xamlのGrid)が自動的にMainContentにセットされます。
FocusVisualStyleにnullを設定することにより、フォーカス時に点線で囲われてしまうのを防ぎます。
boolToVisibility、invertBool、executeCommandは後ほど説明します。
<Grid xmlns="http://schemas.microsoft.com/winfx/2006/xaml/presentation"
      xmlns:x="http://schemas.microsoft.com/winfx/2006/xaml"
      xmlns:d="http://schemas.microsoft.com/expression/blend/2008"
      xmlns:mc="http://schemas.openxmlformats.org/markup-compatibility/2006"
      mc:Ignorable="d"
      d:DesignWidth="300" d:DesignHeight="300">
    <ContentControl x:Name="contentControl" FocusVisualStyle="{x:Null}"/>
    <Grid x:Name="gridMessageBox" Margin="30" Background="DodgerBlue">
        <TextBlock x:Name="textBlock" Text="TextBlock" Foreground="White" HorizontalAlignment="Center" VerticalAlignment="Center" TextWrapping="Wrap" />
        <Button x:Name="buttonClose" Content="閉じる" HorizontalAlignment="Right" VerticalAlignment="Bottom" Margin="0 0 10 10" Width="75" Height="23"/>
    </Grid>
</Grid>
F#
[<ContentProperty("MainContent")>]
type MessageBoxPresenter() as this =
    inherit ContentControl(FocusVisualStyle = null)
    let grid = Application.LoadComponent(Uri("MessageBox.xaml", UriKind.Relative)) :?> Grid
    let contentControl = grid.FindName("contentControl") :?> ContentControl
    let gridMessageBox = grid.FindName("gridMessageBox") :?> Grid
    let textBlock      = grid.FindName("textBlock")      :?> TextBlock
    let buttonClose    = grid.FindName("buttonClose")    :?> Button
    do  this.Content <- grid
        textBlock.SetBinding     (TextBlock.TextProperty,           Binding("Text",        Source = this))                               |> ignore
        gridMessageBox.SetBinding(Grid.VisibilityProperty,          Binding("IsOpen",      Source = this, Converter = boolToVisibility)) |> ignore
        contentControl.SetBinding(ContentControl.ContentProperty,   Binding("MainContent", Source = this))                               |> ignore
        contentControl.SetBinding(ContentControl.IsEnabledProperty, Binding("IsOpen",      Source = this, Converter = invertBool))       |> ignore

        buttonClose.Click |> Event.add (fun _ -> executeCommand this.ClosedCommand ())

    static member val MainContentProperty = DependencyProperty.Register("MainContent", typeof<obj>, typeof<MessageBoxPresenter>)
    member this.MainContent with get()      = this.GetValue(MessageBoxPresenter.MainContentProperty)
                            and  set(x:obj) = this.SetValue(MessageBoxPresenter.MainContentProperty, x)

    static member val TextProperty = DependencyProperty.Register("Text", typeof<string>, typeof<MessageBoxPresenter>)
    member this.Text with get()         = this.GetValue(MessageBoxPresenter.TextProperty) :?> string
                     and  set(x:string) = this.SetValue(MessageBoxPresenter.TextProperty, x)

    static member val IsOpenProperty = DependencyProperty.Register("IsOpen", typeof<bool>, typeof<MessageBoxPresenter>)
    member this.IsOpen with get()       = this.GetValue(MessageBoxPresenter.IsOpenProperty) :?> bool
                       and  set(x:bool) = this.SetValue(MessageBoxPresenter.IsOpenProperty, x)

    static member val ClosedCommandProperty = DependencyProperty.Register("ClosedCommand", typeof<ICommand>, typeof<MessageBoxPresenter>)
    member this.ClosedCommand with get()           = this.GetValue(MessageBoxPresenter.ClosedCommandProperty) :?> ICommand
                              and  set(x:ICommand) = this.SetValue(MessageBoxPresenter.ClosedCommandProperty, x)
boolToVisibility、invertBool、executeCommand
Binding時に値を変換するにはIValueConverterを利用します。
TwoWayで利用することはないので、Convertのみ実装すれば問題ありません。
let createValueConverter (f : 'a -> 'b) =
    { new IValueConverter with
        member x.Convert(value, _, _, _) =
            value :?> 'a |> f :> obj
        member x.ConvertBack(_, _, _, _) =
            failwith "Not available" }

let boolToVisibility = createValueConverter (fun (x : bool) ->
    if x then Visibility.Visible
         else Visibility.Collapsed)

let invertBool = createValueConverter not

let executeCommand (x : ICommand) parameter =
    if x <> null then
        x.Execute(parameter)
XAMLデザイナが動作しない
MainWindow.xamlでMessageBoxPresenterを貼り付けた際、現状デザイナが動作しなくなります。
MessageBoxPresenterでのLoadComponentでリソース位置が解決できていないようです。
解決策がわかりましたら修正いたします。
EmbeddedResourceなら動作しました。
F#でWPF --- Resource、Content、EmbeddedResource - 何でもプログラミング
F#でWPF --- 可変個のコントロール --- 型で生成するコントロールを変更
下記記事では同じ型のリストを元にコントロールを作成しました。
F#でWPF --- 可変個のコントロール - 何でもプログラミング
今回は異なる型のリスト(ベースクラスのリストで、各インスタンスの型はバラバラ)を元にコントロールを作成してみます。
作成するアプリケーション
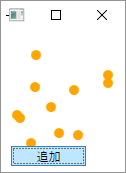
追加ボタンを押すと、円か正方形がランダムに追加されるアプリケーションを作成します。

Xaml基本フォーマット
Resourcesの中にDataTemplateを複数用意します。
DataTypeに対象の型を指定することにより関連付けされます。
<ItemsControl ItemsSource="{Binding Data}" >
    <ItemsControl.Resources>
        <DataTemplate DataType="{x:Type MyType1}">
            <!-- Control1 -->
        </DataTemplate>
        <DataTemplate DataType="{x:Type MyType2}">
            <!-- Control1 -->
        </DataTemplate>
    </ItemsControl.Resources>
</ItemsControl>
コード全体
Shapeの定義に判別共用体を使いたいのですが、DataTemplateのDataTypeで認識されません。
そのため純粋なクラスの継承で記述してあります。
判別共用体でうまくDataTypeに指定できる方法が見つかりましたらまた記事にしたいと思います。
Program.fsで利用しているDataContextは下記記事を参照してください。
F#でWPF --- Elm Architectureを利用したMVVM - 何でもプログラミング
アプリケーション名はShapes.exeです。
Shapes.fs
namespace Shapes

open System.Windows

[<AbstractClass>]
type Shape(position : Point) =
    member this.Position = position

type Circle(position : Point) =
    inherit Shape(position)

type Rectangle(position : Point) =
    inherit Shape(position)
Program.fs
open System
open Shapes

type Msg = AddShape

type Model = { Shapes : Shape list }

let initialModel = { Shapes = [] }

let random = Random()

let updateModel model msg =
    let p = Windows.Point(random.Next(100) |> double, random.Next(100) |> double)
    match msg with
    | AddShape ->
        let shape = match random.Next(2) with
                    | 1 -> Circle(p)    :> Shape
                    | _ -> Rectangle(p) :> Shape
        { model with Shapes = shape :: model.Shapes }

open System.Windows

[<STAThread>]
[<EntryPoint>]
let main argv =
    let window = Application.LoadComponent(Uri("MainWindow.xaml", UriKind.Relative)) :?> Window
    window.DataContext <- DataContext(initialModel, updateModel, id)
    Application().Run(window) |> ignore
    0
<Window xmlns="http://schemas.microsoft.com/winfx/2006/xaml/presentation"
        xmlns:x="http://schemas.microsoft.com/winfx/2006/xaml"
        xmlns:local="clr-namespace:Shapes;assembly=Shapes"
        Title="MainWindow" Height="180" Width="140">
    <Grid>
        <ItemsControl ItemsSource="{Binding Shapes}" Width="100" Height="100" Margin="10,10,0,0" VerticalAlignment="Top" HorizontalAlignment="Left">
            <ItemsControl.ItemsPanel>
                <ItemsPanelTemplate>
                    <Canvas />
                </ItemsPanelTemplate>
            </ItemsControl.ItemsPanel>
            <ItemsControl.Resources>
                <DataTemplate DataType="{x:Type local:Circle}">
                    <Ellipse Width="15" Height="15" Fill="Orange" />
                </DataTemplate>
                <DataTemplate DataType="{x:Type local:Rectangle}">
                    <Rectangle Width="15" Height="15" Fill="Orange" />
                </DataTemplate>
            </ItemsControl.Resources>
            <ItemsControl.ItemContainerStyle>
                <Style>
                    <Setter Property="Canvas.Left" Value="{Binding Position.X}" />
                    <Setter Property="Canvas.Top"  Value="{Binding Position.Y}" />
                </Style>
            </ItemsControl.ItemContainerStyle>
        </ItemsControl>
        <Button Content="追加" Command="{Binding AddShape}" HorizontalAlignment="Left" Margin="10,115,0,0" VerticalAlignment="Top" Width="75"/>
    </Grid>
</Window>
F#でWPF --- 可変個のコントロール
F#でWPFプロジェクトを作成する方法は下記記事を参照してください。
F#でWPF --- ウィンドウ表示 - 何でもプログラミング
作成するアプリケーション
ボタンを押す度、ランダムな位置に円シェイプを追加するアプリケーションを作成します。

コード(F#側)
コード内で利用しているDataContextは下記記事を参照してください
F#でWPF --- Elm Architectureを利用したMVVM - 何でもプログラミング
open System
open System.Windows

type Msg = AddCircle

type Model = { Circles : Point list }

let initialModel = { Circles = [] }

let random = Random()

let updateModel model msg =
    match msg with
    | AddCircle ->
        let p = Point(random.Next(100) |> double, random.Next(100) |> double)
        { model with Circles = p :: model.Circles }

[<STAThread>]
[<EntryPoint>]
let main argv =
    let window = Application.LoadComponent(Uri("MainWindow.xaml", UriKind.Relative)) :?> Window
    window.DataContext <- DataContext(initialModel, updateModel, id)
    Application().Run(window) |> ignore
    0
ItemsControl
可変個のコントロールを表示する際に、ItemsControlが利用できます。
基本的な使い方は下記のようなフォーマットになります。
<ItemsControl ItemsSource="{Binding Data}" >
    <ItemsControl.ItemsPanel>
        <ItemsPanelTemplate>
            <!-- Controlを配置するPanel -->
        </ItemsPanelTemplate>
    </ItemsControl.ItemsPanel>
    <ItemsControl.ItemTemplate>
        <DataTemplate>
            <!-- Control -->
        </DataTemplate>
    </ItemsControl.ItemTemplate>
</ItemsControl>
可変個の円
Canvas上に可変個のEllipseを配置するにはこのようなコードになります。
Ellipseは全てItemContainerで包まれているため、Canvas.Leftを設定する場合はItemContainerStyleで設定する必要があります。
<ItemsControl ItemsSource="{Binding Circles}" >
    <ItemsControl.ItemsPanel>
        <ItemsPanelTemplate>
            <Canvas />
        </ItemsPanelTemplate>
    </ItemsControl.ItemsPanel>
    <ItemsControl.ItemTemplate>
        <DataTemplate>
            <Ellipse Width="10" Height="10" Fill="Orange" />
        </DataTemplate>
    </ItemsControl.ItemTemplate>
    <ItemsControl.ItemContainerStyle>
        <Style>
            <Setter Property="Canvas.Left" Value="{Binding X}" />
            <Setter Property="Canvas.Top"  Value="{Binding Y}" />
        </Style>
    </ItemsControl.ItemContainerStyle>
</ItemsControl>
ItemContainerStyleを利用しない場合
EllipseをCanvasで包みます。
<ItemsControl ItemsSource="{Binding Circles}" >
    <ItemsControl.ItemsPanel>
        <ItemsPanelTemplate>
            <Canvas />
        </ItemsPanelTemplate>
    </ItemsControl.ItemsPanel>
    <ItemsControl.ItemTemplate>
        <DataTemplate>
            <Canvas>
                <Ellipse Canvas.Left="{Binding X}" Canvas.Right="{Binding Y}" Width="10" Height="10" Fill="Orange" />
            </Canvas>
        </DataTemplate>
    </ItemsControl.ItemTemplate>
</ItemsControl>
Xaml全体
<Window xmlns="http://schemas.microsoft.com/winfx/2006/xaml/presentation"
        Title="MainWindow" Height="180" Width="140">
    <Grid>
        <ItemsControl ItemsSource="{Binding Circles}" Width="100" Height="100" Margin="10,10,0,0" VerticalAlignment="Top" HorizontalAlignment="Left">
            <ItemsControl.ItemsPanel>
                <ItemsPanelTemplate>
                    <Canvas />
                </ItemsPanelTemplate>
            </ItemsControl.ItemsPanel>
            <ItemsControl.ItemTemplate>
                <DataTemplate>
                    <Ellipse Width="10" Height="10" Fill="Orange" />
                </DataTemplate>
            </ItemsControl.ItemTemplate>
            <ItemsControl.ItemContainerStyle>
                <Style>
                    <Setter Property="Canvas.Left" Value="{Binding X}" />
                    <Setter Property="Canvas.Top"  Value="{Binding Y}" />
                </Style>
            </ItemsControl.ItemContainerStyle>
        </ItemsControl>
        <Button Content="追加" Command="{Binding AddCircle}" HorizontalAlignment="Left" Margin="10,115,0,0" VerticalAlignment="Top" Width="75"/>
    </Grid>
</Window>
拡張プロパティ(F#)
F#では既存の型を拡張して、プロパティを追加することができます。
今回はいくつか使い方を紹介します。
Getterのみ
Listを拡張してみます。
ジェネリックなクラスは拡張できないので、ベースのIListを拡張します。
Countの2倍の値を返すCountDoubleを実装してみます。
open System.Collections
open System.Collections.Generic

type IList with
    member this.DoubleCount = this.Count * 2

[<EntryPoint>]
let main argv =
    let x = List<int>([ 1; 2; 3 ])
    let s = x.DoubleCount // 6
    0
Setter対応
F#基本的にImmutableであるため、Setterを実装することは稀です。
ただ、利用する機会がある可能性があるので実装してみます。
型拡張は原理的にはstaticな関数を追加しているだけなので、fieldを追加することができません。
そこでインスタンスをキーとして状態を保持するDictionaryを用意します。
しかしDictionaryを利用するとインスタンスが参照され続けるので、弱参照で保持するConditionalWeakTableを利用します。
open System.Collections
open System.Collections.Generic
open System.Runtime.CompilerServices

type ListState = { mutable Name : string }

let initialListState = { Name = "name" }

let listStates = ConditionalWeakTable<IList, ListState>()

let getListState x = listStates.GetValue(x, ConditionalWeakTable.CreateValueCallback(fun _ -> initialListState))

type IList with
    member this.Name with get()      = (getListState this).Name
                     and  set(value) = (getListState this).Name <- value

[<EntryPoint>]
let main argv =
    let x = List<int>([ 1; 2; 3 ])
    x.Name <- "NewList"
    printfn "%s" x.Name
    0
F#スクリプト
F#スクリプトは、わざわざソリューションやプロジェクトを作成することなく利用できるため、とても便利です。
fsxファイル作成
F# Interactiveに直接入力しても動作しますが、fsxファイルに記述したほうがインテリセンスやデバッグを利用できるためfsxを作成します。
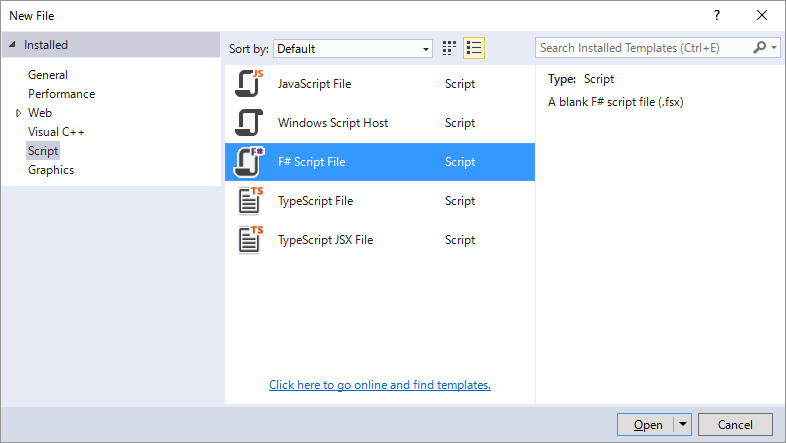
File → New → Fileから "F# Script File" を選択します。


Hello World
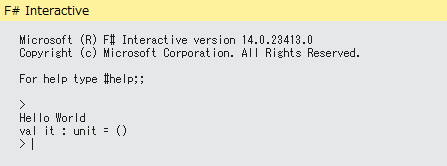
fsxに下記コードを記述して、全体を選択 → 右クリックメニュー → Execute In Interactiveを選択します。
F# Interactiveが立ち上がり、選択したコードが実行されます。


デバッグ有効化
Tools → OptionsでOptionsダイアログを起動します。
F# Tools → F# Interactive → Enable script debuggingをTrueに設定します。
Debugging → General → Use Managed Compatibility Modeのチェックを外します。
設定を有効化するため、F# Interactive上で右クリックメニュー → Reset Interactive Sessionを選択して再起動をします。


ディレクティブ
| #r | dllを参照 | #r "c:/lib/MyLib.dll" |
| #I | dll検索フォルダの追加 | #I "C:/lib" #r "MyLib.dll" |
| #load | fsファイルのロード | #load "MyFSharp.fs" |
| #quit | 宣言された行で実行を終了 | |
| #time | 時間を表示 | Real: 00:00:00.507, CPU: 00:00:00.000, GC gen0: 0, gen1: 0, gen2: 0 |
サブフォルダを含む、フォルダ内のファイルの取得(F#)
下記のようなフォルダ構造があった際に、file1.txt、file2.txt、file1_1.txtのパスを取得する関数をF#で実装します。

breadthFirstSearch
汎用的な幅優先探索を実装します。
開始点と、要素から子要素を取得する関数を入力とします。
Queueを用いて手続き的な実装をしました。
module Seq =
    let breadthFirstSearch (children : 'a -> 'a seq) (root : 'a) =
        seq { let queue = System.Collections.Generic.Queue<'a>([ root ])
              while 0 < queue.Count do
                  let item = queue.Dequeue()
                  children item |> Seq.iter queue.Enqueue
                  yield item }
breadthFirstSearch(Seqモジュールのみで実装)
参考例として、whileを使わずに実装してみました。
module Seq =
    let breadthFirstSearch (children : 'a -> 'a seq) (root : 'a) =
        Seq.initInfinite id
        |> Seq.scan (fun queue _ -> queue.Tail @ (children queue.Head |> Seq.toList)) [ root ]
        |> Seq.takeWhile (List.isEmpty >> not)
        |> Seq.map List.head
descendantFiles
フォルダを入力で受け取り、ファイルパスのSeqを返す関数を実装します。
open System.IO

let descendantFiles path =
    Seq.breadthFirstSearch Directory.EnumerateDirectories path
    |> Seq.collect Directory.EnumerateFiles
動作確認
FolderBrowserDialogを利用するため、System.Windows.Forms.dllを参照に追加します。

[<EntryPoint>]
open System.Windows.Forms

let main argv =
    use dialog = new FolderBrowserDialog()
    if dialog.ShowDialog() = DialogResult.OK then
        descendantFiles dialog.SelectedPath
        |> Seq.iter (printfn "%s")


