WPFにおけるMVVM
従来方式での実装
ボタンに登録されたコールバック内にてcountを増減し、テキストにcountを設定する、といった実装となります。
Xaml
<Window x:Class="Counter.MainWindow"
        xmlns="http://schemas.microsoft.com/winfx/2006/xaml/presentation"
        xmlns:x="http://schemas.microsoft.com/winfx/2006/xaml"
        Title="MainWindow" Height="100" Width="215">
    <Grid>
        <Button Content="-" Click="buttonDecrement_Click" HorizontalAlignment="Left" Margin="46,23,0,0" VerticalAlignment="Top" Width="25"/>
        <TextBlock x:Name="textCount" Text="0" HorizontalAlignment="Left" Margin="97,25,0,0" TextWrapping="Wrap" VerticalAlignment="Top"/>
        <Button Content="+" Click="buttonIncrement_Click" HorizontalAlignment="Left" Margin="132,23,0,0" VerticalAlignment="Top" Width="25"/>
    </Grid>
</Window>
using System.Windows;

namespace Counter
{
    public partial class MainWindow : Window
    {
        int count = 0;
        public MainWindow()
        {
            InitializeComponent();
        }
        private void buttonIncrement_Click(object sender, RoutedEventArgs e)
        {
            count++;
            textCount.Text = count.ToString();
        }
        private void buttonDecrement_Click(object sender, RoutedEventArgs e)
        {
            count--;
            textCount.Text = count.ToString();
        }
    }
}
ViewとViewModelの分離
| View | UIからの入力をViewModelへ送信、ViewModelで変更のあった値をUIに適用。 この二つに絞ることによりUIスタイルの開発に専念。 |
| ViewModel | Viewからのコマンドに基づいて処理、Viewに変更を通知。 UIのスタイルに囚われずロジックに専念。 |
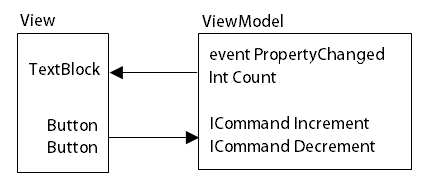
WPFでは
View→ViewModelにICommand
ViewModel→ViewにINotifyPropertyChanged
が利用されます。
カウンタの例では下図のような実装になります。

ICommandを継承したクラスの実装
下記のSimpleCommandは登録したActionを実行するだけのCommandになります。
CanExecuteも提供されているのですが、別途boolのプロパティを用意してコントロールのIsEnabledにバインドしたほうが入力出力が分離されてわかりやすいと思います。
class SimpleCommand : ICommand
{
    Action execute;
    public SimpleCommand(Action execute)
    {
        this.execute = execute;
    }
    public event EventHandler CanExecuteChanged;
    public bool CanExecute(object parameter)
        => true;
    public void Execute(object parameter)
        => execute();
}
Viewから見たViewModel
class ViewModel : INotifyPropertyChanged
{
    public event PropertyChangedEventHandler PropertyChanged;
    public int Count { get; }

    public ICommand Increment { get; }
    public ICommand Decrement { get; }
}
ViewModel --- Countプロパティの実装
setter内では、内部変数を更新して変更通知を出しています。
特にsetter内に記述する必要はありませんが、簡単のためsetterを利用しています。
int count;
public int Count
{
    get
    {
        return count;
    }
    private set
    {
        count = value;
        PropertyChanged?.Invoke(this, new PropertyChangedEventArgs(nameof(Count)));
    }
}
ViewModel --- Commandの実装
コンストラクタ内でICommandプロパティを実装します。
public ViewModel()
{
    Increment = new SimpleCommand(() => Count++);
    Decrement = new SimpleCommand(() => Count--);
}
View --- Xamlの編集
XamlにはBindingが用意されており、DataContext(後述)に設定されているインスタンスのプロパティを自動的に取得します。またPropertyChangedが発行された場合に自動的に更新されます。
<Window x:Class="Counter.MainWindow"
        xmlns="http://schemas.microsoft.com/winfx/2006/xaml/presentation"
        xmlns:x="http://schemas.microsoft.com/winfx/2006/xaml"
        Title="MainWindow" Height="100" Width="215">
    <Grid>
        <Button Content="-" Command="{Binding Decrement}" HorizontalAlignment="Left" Margin="46,23,0,0" VerticalAlignment="Top" Width="25"/>
        <TextBlock Text="{Binding Count}" HorizontalAlignment="Left" Margin="97,25,0,0" TextWrapping="Wrap" VerticalAlignment="Top"/>
        <Button Content="+" Command="{Binding Increment}" HorizontalAlignment="Left" Margin="132,23,0,0" VerticalAlignment="Top" Width="25"/>
    </Grid>
</Window>
コード全体
MainWindowのコンストラクタでDataContextにViewModelインスタンスを設定しています。
using System;
using System.ComponentModel;
using System.Windows;
using System.Windows.Input;

namespace Counter
{
    class SimpleCommand : ICommand
    {
        Action execute;
        public SimpleCommand(Action execute)
        {
            this.execute = execute;
        }
        public event EventHandler CanExecuteChanged;
        public bool CanExecute(object parameter)
            => true;
        public void Execute(object parameter)
            => execute();
    }

    class ViewModel : INotifyPropertyChanged
    {
        public event PropertyChangedEventHandler PropertyChanged;
        int count;
        public int Count
        {
            get
            {
                return count;
            }
            private set
            {
                count = value;
                PropertyChanged?.Invoke(this, new PropertyChangedEventArgs(nameof(Count)));
            }
        }
        public ICommand Increment { get; }
        public ICommand Decrement { get; }
        public ViewModel()
        {
            Count = 0;
            Increment = new SimpleCommand(() => Count++);
            Decrement = new SimpleCommand(() => Count--);
        }
    }

    public partial class MainWindow : Window
    {
        public MainWindow()
        {
            InitializeComponent();
            var viewModel = new ViewModel();
            DataContext = viewModel;
        }
    }
}
Model
今回の例ではModelは登場しませんでしたが、実際の開発ではModelとViewModelを分離することがあります。
ViewModel、Modelの分離の仕方、通信の仕方に規定はありませんので、開発者が自由に設定できます。
個人的な分離の仕方としては
Model : 状態(≒変数)
ViewModel : Viewが参照できるようModelを変換
がよいと思います。
今回の例であえて分離するとするなら、countフィールドがModelと考えられます。
TwoWayBinding
BindingにはTwoWayモードが存在し、UIの入力がCommandではなくBindingしているプロパティのsetterに渡されます。
入力はCommandに集約しているほうが見通しがよく、またsetterにPropertyChangedを実装していると動作が予測できなくなる可能性がありますので、個人的にはTwoWayを利用しないようにしています。
実際の応用
MVVM構造にすることにより、機能のパーツ化、テストのしやすさの向上などが見込まれます。
一方で冗長な記述になってしまうといった問題もあります。
実務ではこれを解決するために、コード自動生成やポストプロセス、またはライブラリやフレームワークが利用されています。
