PHP --- フレームワークを利用しないでToDoアプリ作成(3)
前回は、ルーティングの機能まで実装しました。
PHP --- フレームワークを利用しないでToDoアプリ作成(2) - 何でもプログラミング
今回はデータベースと連携して、実際のToDoアプリを構築してみたいと思います。
データベースはSQLiteを利用しており、CSRF対策はまだ入れていません。
今回の作成物
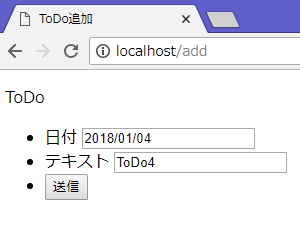
下図のように、ToDoの一覧ページと、追加ページからなります。
簡単のため、編集の機能は搭載してありません。
 |
 |
View部分は、layout.php、todoList.php、todoAdd.phpの3ファイルからなります。
データベースは、database.sqliteという名前のファイルで、下記のtodoテーブルが定義してあります。
| id | INTEGER | PRIMARY KEY AUTOINCREMENT |
| date | TEXT | |
| text | TEXT |
layout.php
<!DOCTYPE html>
<html lang="ja">
<head>
    <meta charset="UTF-8">
    <title><?php safeEcho($title) ?></title>
</head>
<body>
<header>
    <p>ToDo</p>
</header>
<main>
    <?php echo $body ?>
</main>
</body>
</html>
todoList.php
<?php ob_start(); ob_implicit_flush(0); ?>

<a href="/add">追加</a>

<table>
<?php foreach ($todos as $todo) { ?>
    <tr>
        <td>
            <?php safeEcho($todo->date->format('Y/m/d')) ?>
        </td>
        <td>
            <?php safeEcho($todo->text) ?>
        </td>
        <td>
            <form action="/delete" method="post">
                <input type="hidden" name="id" value="<?php safeEcho($todo->id) ?>">
                <button type="submit">削除</button>
            </form>
        </td>
    </tr>
<?php } ?>
</table>

<?php
$title = 'ToDo一覧';
$body  = ob_get_clean();
require 'layout.php';
?>
todoAdd.php
<?php ob_start(); ob_implicit_flush(0); ?>

<?php if (empty($errors) === false) { ?>
<ul>
<?php foreach ($errors as $error) { ?>
    <li>
        <?php safeEcho($error) ?>
    </li>
<?php } ?>
</ul>
<?php } ?>

<form action="/add" method="post">
    <ul>
        <li>
            <label>
                日付
                <input type="text" name="date" value="<?php safeEcho($date) ?>">
            </label>
        </li>
        <li>
            <label>
                テキスト
                <input type="text" name="text" value="<?php safeEcho($text) ?>">
            </label>
        </li>
        <li>
            <button type="submit">送信</button>
        </li>
    </ul>
</form>

<?php
$title = 'ToDo追加';
$body  = ob_get_clean();
require 'layout.php';
?>
index.php
<?php
function connectDB() : PDO {
    return connectSQLite('database.sqlite');
}

class ToDo {
    const DATE_FORMAT = 'Y/m/d';
    public $id;
    public $date;
    public $text;
    public static function insert(PDO $db, DateTime $date, string $text) : void {
        $db->prepare('INSERT INTO todo(date, text) VALUES (?, ?)')
            ->execute([ $date->format(self::DATE_FORMAT), $text ]);
    }
    public static function delete(PDO $db, int $id) : void {
        $db->prepare('DELETE FROM todo WHERE id = ?')
            ->execute([ $id ]);
    }
    public static function exists(PDO $db, int $id) : bool {
        $statement = $db->prepare('SELECT * FROM todo WHERE id = ?');
        $statement->execute([ $id ]);
        return empty($statement->fetchAll()) === false;
    }
    public static function fetchAll(PDO $db) : array {
        $statement = $db->prepare('SELECT * FROM todo ORDER BY date DESC');
        $statement->execute();
        return array_map(function($x) {
            $todo = new ToDo();
            $todo->id   = $x['id'];
            $todo->date = DateTime::createFromFormat(self::DATE_FORMAT, $x['date']);
            $todo->text = $x['text'];
            return $todo;
        }, $statement->fetchAll());
    }
}

function todoList() : Response {
    $db = connectDB();
    $todos = ToDo::fetchAll($db);
    $content = render('todoList.php', compact('todos'));
    return Response::ok($content);
}

function todoAdd() : Response {
    $errors = [];
    $date = (new DateTime())->format('Y/m/d');
    $text = '';
    $content = render('todoAdd.php', compact('errors', 'date', 'text'));
    return Response::ok($content);
}

function post_todoAdd() : Response {
    $date = assertPOST('date');
    $text = assertPOST('text');

    $validate = new Validate();
    $validate->isTrue(empty($text) === false,  'テキストが空です。');
    $validate->isTrue(mb_strlen($text) <= 100, 'テキストは100文字までです。');

    $dateObj = DateTime::createFromFormat('Y/m/d', $date);
    $validate->isTrue($dateObj !== false, '日付が****/**/**の形式ではありません。');

    $errors = $validate->messages;
    if (empty($errors)) {
        $db = connectDB();
        ToDo::insert($db, $dateObj, $text);
        return Response::redirect('/');
    } else {
        $content = render('todoAdd.php', compact('errors', 'date', 'text'));
        return Response::badRequest($content);
    }
}

function post_todoDelete() : Response {
    $id = assertPOST('id');
    $db = connectDB();
    sqlTransaction($db, function($db) use ($id) {
        assert400(ToDo::exists($db, $id));
        ToDo::delete($db, $id);
    });
    return Response::redirect('/');
}

function onError(Exception $e) : Response {
    if ($e instanceof Exception400) {
        return Response::badRequest('400 Bad Request');
    } else if ($e instanceof Exception404) {
        return Response::notFound('404 Not Found');
    } else {
        return Response::internalServerError('500 Internal Server Error');
    }
}

$routesGET = [
    '/'    => 'todoList',
    '/add' => 'todoAdd',
];
$routesPOST = [
    '/add'    => 'post_todoAdd',
    '/delete' => 'post_todoDelete'
];

respond(getPathInfo(), $routesGET, $routesPOST, 'onError');
connectSQLite
SQLiteに接続する関数になります。
エラーを例外で送出、連想配列でデータを取得、静的プレースホルダーを利用するようにしています。
なお、データベースファイルは絶対パスで指定する必要があります。
<?php
function connectSQLite(string $name) : PDO {
    $db = new PDO("sqlite:{$name}");
    $db->setAttribute(PDO::ATTR_ERRMODE, PDO::ERRMODE_EXCEPTION);
    $db->setAttribute(PDO::ATTR_DEFAULT_FETCH_MODE, PDO::FETCH_ASSOC);
    $db->setAttribute(PDO::ATTR_EMULATE_PREPARES, false);
    return $db;
}
sqlTransaction
トランザクションを毎回記述するのを回避するため、callableを受け取る関数を定義しました。
<?php
function sqlTransaction(PDO $db, callable $f) : void {
    try {
        $db->beginTransaction();
        $f($db);
        $db->commit();
    } catch (Exception $e) {
        $db->rollBack();
        throw $e;
    }
}
Validate
POSTパラメータの検証の記述量削減のため、下記のようなクラスを準備してみました。
<?php
class Validate {
    public $messages = [];
    public function isTrue(bool $condition, string $message) : void {
        if ($condition === false) {
            array_push($this->messages, $message);
        }
    }
}
ついでにException400を送出するassert関数も定義してみました。
<?php
function assert400(bool $condition) {
    if ($condition === false) {
        throw new Exception400();
    }
}
function assertPOST(string $key) {
    if (isset($_POST[$key])) {
        return $_POST[$key];
    } else {
        throw new Exception400();
    }
}
PHP --- フレームワークを利用しないでToDoアプリ作成(2)
前回の記事にて、Viewをレンダリングして、レスポンスを生成して返すところまで実装しました。
PHP --- フレームワークを利用しないでToDoアプリ作成(1) - 何でもプログラミング
今回はURLに応じて表示する内容を変更するよう実装してみたいと思います。
また、ページ毎に同じ内容が表示できるよう、レイアウトの対応もしてみたいと思います。
今回の作成物
ページ共有部分を定義するlayout.phpと、適当な2つのページpage1.php、page2.php、コントロール部分のindex.phpからなります。
index.phpでは、リクエストのURL毎にレスポンスを生成する関数を定義してあり、URLと関数の対応を連想配列で定義してあります。
連想配列のキーでは、コロン( : )で始まる部分はそのまま関数の引数として渡されます。(今回は名前に意味はなく、出現順で引数に渡されます。)
また例外が生じた際のレスポンスを決める関数も定義してあります。
レイアウトの適用は、前記事でも利用したob_start、ob_get_cleanの仕組みを利用して、各ページで行っています。
またcompact関数は、変数を連想配列に変換してくれる関数です。
layout.php
<!DOCTYPE html>
<html lang="ja">
<head>
    <meta charset="UTF-8">
    <title><?php safeEcho($title) ?></title>
</head>
<body>
<header>
    <p>Site header</p>
</header>
<main>
<?php echo $body ?>
</main>
</body>
</html>
page1.php
<?php ob_start(); ob_implicit_flush(0); ?>

<h1>Page1</h1>
<p><?php safeEcho($text) ?></p>

<?php
$title = 'page1';
$body  = ob_get_clean();
require 'layout.php';
?>
page2.php
<?php ob_start(); ob_implicit_flush(0); ?>

<h1>Page2</h1>
<p><?php safeEcho($text) ?></p>

<?php
$title = 'page2';
$body  = ob_get_clean();
require 'layout.php';
?>
index.php
<?php
function page1(string $text) : Response {
    $content = render('page1.php', compact('text'));
    return Response::ok($content);
}

function page2(string $text) : Response {
    $content = render('page2.php', compact('text'));
    return Response::ok($content);
}

function onError(Exception $e) : Response {
    if ($e instanceof Exception404) {
        return Response::notFound('404 Not Found');
    } else {
        return Response::internalServerError('500 Internal Server Error');
    }
}

$routesGET = [
    '/page1/:text' => 'page1',
    '/page2/:text' => 'page2'
];

respond($_SERVER['PATH_INFO'], $routesGET, [], 'onError');
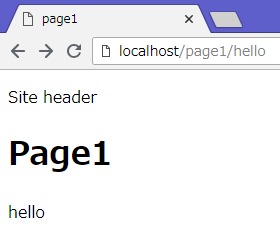
結果は下記のようになります。
 |
 |
 |
respond関数
入力のPathInfoに対し、適合するルートを探してコールバックを呼び、レスポンスを送出する関数になります。
今回はGETとPOSTのみ想定しており、別々の連想配列を受け取るようにしてあります。
<?php
function respond(string $pathInfo, array $routesGET, array $routesPOST, callable $onError) : void {
    try {
        if ($_SERVER['REQUEST_METHOD'] === 'GET') {
            $response = getResponse($pathInfo, $routesGET);
        } else if ($_SERVER['REQUEST_METHOD'] === 'POST') {
            $response = getResponse($pathInfo, $routesPOST);
        }
        if (isset($response)) {
            $response->send();
        } else {
            throw new Exception404();
        }
    } catch (Exception $e) {
        $onError($e)->send();
    }
}

class Exception404 extends Exception {};
getResponseは下記のように定義してあります。
適合するルートがあれば、call_user_func_arrayでコールバックを呼び出しています。
<?php
function getResponse(string $pathInfo, array $callbackMap) : ?Response {
    foreach ($callbackMap as $route => $f) {
        $matches = matchRoute($route, $pathInfo);
        if (isset($matches)) {
            return call_user_func_array($f, $matches);
        }
    }
    return null;
}
matchRouteは下記のように定義してあります。
コロンで始まる場所を、正規表現の変数取り出しの形式に変更してからpreg_matchを呼び出しています。
matchesの最初の要素にはマッチした全体が格納されているので、取り除いています。
<?php
function matchRoute(string $route, string $pathInfo) : ?array {
    $pattern = preg_replace('#:[^/]+#', '([^/]+)', $route);
    $matches = [];
    if (preg_match("#^{$pattern}$#", $pathInfo, $matches) === 1) {
        array_shift($matches);
        return $matches;
    } else {
        return null;
    }
}
モバイル判定
HTTP_USER_AGENTを利用することにより、リクエストがモバイル端末からかどうかを判定することができます。
PCとモバイルで表示を変える際に利用することができます。
<?php
function isMoble() : bool {
    $userAgent = $_SERVER['HTTP_USER_AGENT'];
    // Android
    if (str_contains($userAgent, 'Android') && str_contains($userAgent, 'Mobile')){
        return true;
    }
    // others
    foreach ([ 'iPhone', 'iPod', 'Windows Phone', 'BlackBerry' ] as $name) {
        if (str_contains($userAgent, $name)) {
            return true;
        }
    }
    return false;
}
function str_contains(string $str, string $word) : bool {
    return strpos($str, $word) !== false;
}
.htaccessを利用している場合は、下記を追記するとデバイスで表示が変わることを明記できます。
Header set Vary User-Agent
PathInfo
今回は$_SERVERのPATH_INFOを利用しましたが、環境によっては利用できないことがあります。
回避の一例として、URLのパラメータとして渡した場合を紹介してみたいと思います。
<?php
function getPathInfo() : string {
    $pathInfo = '/';
    if (isset($_SERVER['PATH_INFO'])) {
        $pathInfo = $_SERVER['PATH_INFO'];
    } else if (isset($_GET['path-info'])) {
        $pathInfo = $_GET['path-info'];
    }
    return $pathInfo;
}
<IfModule mod_rewrite.c>
    RewriteEngine On
    RewriteBase /
    RewriteCond %{REQUEST_FILENAME} !-f
    RewriteCond %{REQUEST_FILENAME} !-d
    RewriteRule ^(.+)$ index.php?path-info=/$1 [L]
</IfModule>
PHP --- フレームワークを利用しないでToDoアプリ作成(1)
PHPにはCakePHPやLaravelなどのフレームワークがたくさん存在します。
このシリーズでは、これらのフレームワークを利用せず、一からToDoアプリを作成してみたいと思います。
本実装はローレベルの挙動を理解するためのものとして、実際のアプリ作成ではフレームワークを利用することをお勧めします。
本実装は下記の書籍「パーフェクトPHP」を大いに参照しています。
https://www.amazon.co.jp/dp/4774144371
今回の作成物
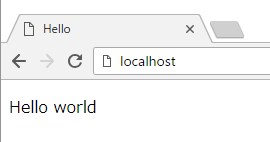
下記のindex.phpとview.phpを準備してindex.phpにアクセスすると、Hello worldと表示されるページが返ってきます。
index.php
<?php
$content = render('view.php', [ 'name' => 'world' ]);
Response::ok($content)->send();
view.php
<!DOCTYPE html>
<html lang="ja">
<head>
    <meta charset="UTF-8">
    <title>Hello</title>
</head>
<body>

<p>Hello <?php safeEcho($name) ?></p>

</body>
</html>

Responseクラス
クライアントにデータを返す役割をはたすクラスになります。
データをセットしてsend関数を呼ぶことでクライアントにデータを送付します。
OKやRedirectなど、よく使うレスポンスを作成する関数をいくつか定義してあります。
<?php
class Response {
    public $statusCode;
    public $statusText;
    public $httpHeaders;
    public $content;
    function __construct(int $statusCode, string $statusText, array $httpHeaders, string $content) {
        $this->statusCode  = $statusCode;
        $this->statusText  = $statusText;
        $this->httpHeaders = $httpHeaders;
        $this->content     = $content;
    }
    function send() : void {
        header("HTTP/1.1 {$this->statusCode} {$this->statusText}");
        foreach ($this->httpHeaders as $name => $value) {
            header("{$name}: {$value}");
        }
        echo $this->content;
    }

    public static function ok(string $content) : Response {
        return new Response(200, 'OK', [], $content);
    }
    public static function redirect(string $pathInfo) : Response {
        $protocol = ($_SERVER['HTTPS'] ?? '') === 'on' ? 'https://' : 'http://';
        $url = $protocol . $_SERVER['HTTP_HOST'] . $pathInfo;
        return new Response(302, 'Found', [ 'Location' => $url ], '');
    }
    public static function badRequest(string $content) : Response {
        return new Response(400, 'Bad Request', [], $content);
    }
    public static function forbidden(string $content) : Response {
        return new Response(403, 'Forbidden', [], $content);
    }
    public static function notFound(string $content) : Response {
        return new Response(404, 'Not Found', [], $content);
    }
    public static function internalServerError(string $content) : Response {
        return new Response(500, 'Internal Server Error', [], $content);
    }
}
render関数
表示用のphp(今回の例だとview.php)を、phpの部分を処理して結果をstringとして取得する関数となります。
extract関数で、辞書データを変数定義に変換します。(今回の例だと、[ 'name' => 'world' ] が $name = 'world' に展開されます。またその他の変数が邪魔をしないよう、アンダースコア始まりにしてあります。)
ob_startとob_get_cleanで囲むことにより、phpの出力を内部バッファに溜めて文字列で取得することができます。
勝手にバッファの内容が送信されないよう、ob_implicit_flushをoffにしてあります。
<?php
function render(string $_file, array $_args) : string {
    extract($_args);

    ob_start();
    ob_implicit_flush(0);
    require $_file;
    return ob_get_clean();
}
F#でコマンドライン引数
コマンドライン引数をパースするライブラリはすでにいくつも存在しますが、今回は簡単なものを実装してみました。
簡単のため、ロング名のみ、値は=での指定のみに対応します。
some.exe --enable --value=10
今回実装したものの利用例
コマンドライン引数用のレコード型とデフォルト値を準備し、parse関数で引数を解析します。
オプションの名前、説明、指定された時の挙動を渡して解析を行います。
type CommandLineOption =
    { Enabled : bool
      Name    : string
      Value   : int
    }

let defaultOption =
    { Enabled = false
      Name    = ""
      Value   = 0
    }

let commandOption =
    CommandLine.perse
        [ CommandLine.noValue "enb" "enable something"
            (fun s -> { s with Enabled = true })

          CommandLine.value "name" "set name"
            (fun s x -> Ok { s with Name = x })

          CommandLine.value "value" "set int value"
            (fun s x ->
                String.parseInt32 x |> Result.ofOption (x + " is not int")
                |> Result.map (fun x -> { s with Value = x })
            )
        ]
        defaultOption
        (argv |> Array.toList)
parse関数
引数の解析を行い、OptionDefinition(後述)に基づいて入力レコードを更新していきます。
--helpオプションが指定された場合は、オプションの一覧を出力します。
オプションが重複して指定された場合や、オプションが存在しない場合はErrorを返します。
type PerseResult<'a> =
    | HelpPrinted
    | Persed of 'a

let perse (options : OptionDefinition<'a> list) (initialValue : 'a) (args : string list) : Result<PerseResult<'a>, string> =
    if args = [ "--help" ] then
        options |> List.iter (fun x -> printf "--%s %s\n" x.Name x.Description)
        Ok HelpPrinted
    else
        let optionMap = options |> List.map (fun x -> x.Name, x) |> Map.ofList
        parseArgs args
        |> Result.bind
            (List.foldResult
                (fun (state, processed) (name, value) ->
                    if processed |> Set.contains name then
                        Error ("--" + name + " is set multiple times")
                    else if not (Map.containsKey name optionMap) then
                        Error ("invalid option --" + name)
                    else
                        optionMap.[name].ParseValue state value
                        |> Result.map (fun x -> x, processed |> Set.add name)
                )
                (initialValue, Set<string>([]))
            )
        |> Result.map (fun (state, _) -> Persed state)
OptionDefinition
ユーザーがオプションの定義をするのに利用する関数は下記の様に定義してあります。
type OptionDefinition<'a> =
    { Name        : string
      Description : string
      ParseValue  : 'a -> string -> Result<'a, string>
    }

let value name description (f : 'a -> string -> Result<'a, string>) : OptionDefinition<'a> =
    { Name        = name
      Description = description
      ParseValue  =
        fun state x ->
            if x = "" then Error ("--" + name + " must have a value")
            else           f state x
    }

let noValue name description (f : 'a -> 'a) : OptionDefinition<'a> =
    { Name        = name
      Description = description
      ParseValue  =
        fun state x ->
            if x = "" then Ok (f state)
            else           Error ("--" + name + " can not have a value")
    }
parseArgs
parse内で利用されているparseArgsは下記の様に定義しています。
let (|Regex|_|) pattern str =
   let result = Regex.Match(str, pattern)
   if result.Success then Some (List.tail [ for x in result.Groups -> x.Value ])
   else                   None

let parseArgs (args : string list) : Result<(string * string) list, string> =
    args |> List.mapResult
        (function
         | Regex "--(..+?)=(.+)" [ x; y ] -> Ok (x, y)
         | Regex "--(..+)"       [ x ]    -> Ok (x, "")
         | x                              -> Error ("invalid argument " + x)
        )
F# Result型 便利関数
F#4.1で導入されたResult型ですが、導入しやすくするよう幾つか便利関数を定義してみました。
随時更新予定です。
Optionから変換
let ofOption (errorValue : 'error) (option : 'a option) : Result<'a, 'error> =
    if option.IsSome then Ok option.Value else Error errorValue
Sequence (Result list -> list Result)
Errorの値はlist化するようにしています。
let sequence (results : Result<'a, 'error> list) : Result<'a list, 'error list> =
    let folder x state =
        match x, state with
        | Ok h,    Ok t    -> Ok (h::t)
        | Ok _,    Error t -> Error t
        | Error h, Ok _    -> Error [ h ]
        | Error h, Error t -> Error (h::t)
    List.foldBack folder results (Ok [])
ちなみにOptionだと下記のようになります。
let sequence (options : 'a option list) : 'a list option =
    List.foldBack (Option.map2 (fun x y -> x::y)) options (Some [])
mapResult
Result型にmapした後に上記のsequenceを適用すれば、listのmapが全て成功したかどうかが判定できます。
しかし途中でErrorとなった場合は以降のmapをする必要がない場合があります。
その時用にmapResultというものを定義してみました。
let mapResult (f : 'a -> Result<'b, 'error>) (list : 'a list) : Result<'b list, 'error> =
    List.fold
        (fun state item -> Result.bind (fun xs -> f item |> Result.map (fun x -> x::xs)) state)
        (Ok [])
        list
    |> Result.map List.rev
foldResult
foldの途中でErrorが存在すればErrorとなる、foldResultを作成してみました。
let foldResult (f : 'b -> 'a -> Result<'b, 'error>) (initialValue : 'b) (list : 'a list) : Result<'b, 'error> =
    List.fold (fun state x -> Result.bind (fun y -> f y x) state) (Ok initialValue) list
ResultBuilder
Resultをコンピュテーション式に対応させてみます。
Option型と全く同じ内容となっています。
type ResultBuilder() =
    member this.Bind(x, f)    = Result.bind f x
    member this.Return(x)     = Ok x
    member this.ReturnFrom(x) = x

let result = ResultBuilder()
下記のように利用できます。
let divide x y =
    if y = 0.0 then Error "zero div"
    else            Ok (x / y)

let x =
    result {
        let! a = divide 100.0 2.0
        let! b = divide a 2.0
        let! c = divide b 0.0
        let! d = divide c 2.0
        return d
    }
    // Error "zero div"
レコード型のフィールド隠蔽(F#)
例えば下記のようなCounterクラスを考えます。
type Counter() =
    let mutable count = 0
    member this.CountUp()   = count <- count + 1
    member this.CountDown() = count <- count - 1
    member this.Count       = count
これをレコード型を用いて実装すると下記のようになります。
privateを付加することで、外側からフィールドにアクセスできなくなります。
[<AutoOpen>]
module CounterModule =
    type Counter = private { mutable Count : int }

    module Counter =
        let create    ()      = { Count = 0 }
        let countUp   counter = counter.Count <- counter.Count + 1
        let countDown counter = counter.Count <- counter.Count - 1
        let count     counter = counter.Count
どちらを利用するか
レコード型を利用したほうが、利用時にF#っぽい記述ができるため、書き方に一貫性が保たれます。
しかしフィールドにmutableが含まれる場合、クラス型のほうを利用したほうが、副作用の場所が差別化され判断しやすくなります。
ほとんどの場合はフィールドがmutableだと考えられる(immutableであれば、ただの変換関数でOKなはず)ので、クラス型の方を利用したほうがよい気がします。
F#のMailboxProcessorで選択的受信
F#にはアクターモデルを実現できるMailboxProcessorクラスが用意されています。
基本的にはキューに積まれたメッセージを順に処理していくものですが、たまに特定のメッセージを先に処理したいときがあります。
今回はMailboxProcessorで選択的に受信するよう実装してみたいと思います。
Erlangでの選択的受信
after 0 を利用して下記の様に記述されます。
important() ->
    receive
        {Priority, Message} when Priority > 10 ->
            [Message | important()]
    after 0 ->
        normal()
    end.

normal() ->
    receive
        {_, Message} ->
            [Message | normal()]
    after 0 ->
        []
    end.
Erlangをまねて実装
TryScanでTimeoutを0に設定することにより、たまったキューの中身を確認しています。
Importantがキューに積まれていた場合は優先的に処理されます。
type Message =
    | Important
    | Normal

let processor =
    MailboxProcessor<Message>.Start
        (fun inbox ->
            let rec loop() =
                async {
                    let! importantProcessed =
                        inbox.TryScan
                            ( function
                              | Important -> Some (async { printf "Important\n" })
                              | _         -> None
                            , 0
                            )
                    if  importantProcessed.IsNone then
                        let! msg = inbox.Receive()
                        match msg with
                        | Important -> printf "Important\n"
                        | Normal    -> printf "Normal\n"

                    do! Async.Sleep 1000

                    return! loop()
                }
            loop()
        )
下記の様にPostすると、
Normal
Important
Important
Normal
Normal
の順に処理されます。
processor.Post(Normal)
System.Threading.Thread.Sleep(100)

processor.Post(Normal)
processor.Post(Important)
processor.Post(Important)
processor.Post(Normal)
終了をWaitできるよう実装
おまけで、終了メッセージを送信し、処理が終わるまでWaitできるよう実装してみました。
AsyncReplyChannelとPostAndReplyを利用してWaitを実現しています。
type Message =
    | Post
    | Exit of AsyncReplyChannel<unit>

let processor =
    MailboxProcessor<Message>.Start
        (fun inbox ->
            let rec loop() =
                async {
                    let! exited =
                        inbox.TryScan
                            ( function
                              | Exit replyChannel ->
                                async {
                                    printf "exit\n"
                                    replyChannel.Reply()
                                }
                                |> Some
                              | _  -> None
                            , 0
                            )
                    if exited.IsNone then
                        let! msg = inbox.Receive()
                        match msg with
                        | Exit replyChannel ->
                            printf "exit\n"
                            replyChannel.Reply()
                        | Post ->
                            printf "post\n"
                            do! Async.Sleep 1000
                            return! loop()
                }
            loop()
        )
下記のようにPostすると、
post
exit
exited
の順にコンソールに出力されます。
processor.Post(Post)
processor.Post(Post)
processor.Post(Post)
System.Threading.Thread.Sleep(100)
processor.PostAndReply(fun x -> Exit x)
printf "exited\n"
実際の利用
TryScanのたびにキューを全部確認しており、またF#ではTaskなどが利用できるため、実際には独自でスレッドとキューを用意したほうが速くてわかりやすいと思います。